:format(webp)/f/122463/3600x2400/09bb098f0a/cows-march-21-5-1.jpg)
Cashminder
Welcome to the Cashminder Help Centre
Here, you'll find a range of resources designed to help you understand and make the most of Cashminder.
Whether you have questions about navigating the software, tracking your cashflow, interpreting reports, or managing your finances more effectively, we're here to support you every step of the way.
Welcome to Cashminder
Once your account is set up, take a moment to explore the intuitive dashboard and get familiar with Cashminder’s features. Whether you're new to financial management tools or an experienced user, the step-by-step guidance below will help you get the most out of Cashminder from day one.
Dowload a file from online banking system
AIB Personal Banking
Click once on My Accounts button to top left
Click once on the farm account (current or loan) that you want to download
Click once on the Historical Transactions button
Click once on the green magnifying glass search button.
Click in to and set the required Start Date
Click in to and set the required End Date
Click on the green Apply Filter button
Click on the Export button to left of the green magnifying glass search button
Scroll down and click once the green Export button on the bottom right
Jump to What do I do after using Export in banking online section below
AIB Business Banking
Click on Account Information, pick the right bank on the right side.
Click on Export Transactions from the menu on the left side.
Enter the required From Date and To Date
Leave the File format as Comma separated variables
Set the File name that you want
Leave the Source as Single A/C
Click on the Export button
Jump to What do I do after using Export in banking online section below Note: AIB business banking will not download credit card accounts
BOI Personal Banking365
Log into 365 Home
Click Statements on the left hand side
Use the drop down menu to pick the bank account you need to download.
Click Advanced on the right of the blue panel at the top of the page
Select the date range you want and click Go
Scroll down to the bottom of the page and click Export Transaction History
Jump to What do I do after using Export in banking online section below Note: Banking 365 can only download data for current and deposit accounts.
What do I do after pressing Export in banking online
The bank file will now be downloaded on to your computer. It can sometimes be confusing to know where this file has been saved to. That is, what folder on your computer contains this bank file? To check this, do as follows...
Note there is a small box on the bottom left of your screen with the name of this new downloaded file.
Note the small drop down menu on the right side of this small box.
Click on this and a small menu will popup.
Select the option Show in folder.
A new screen will appear. Look at the top of this screen to see the folder and sub-folders where this file has been downloaded to.
Other pointers
The main account to download is the farm current account, but if you pay farm expenses via any other accounts, such as a credit card account, download them also, or enter them manually.
It makes sense to update your current and credit card accounts frequently during the year, especially if you are doing cash flow budgets. Loan accounts, on the other hand, could be left to the end of the year.
How to invite my accountant
How to invite your accountant/advisor to access your data in Cashminder
When the Farmer logs into Cashminder, he/she sees their farm list as below.
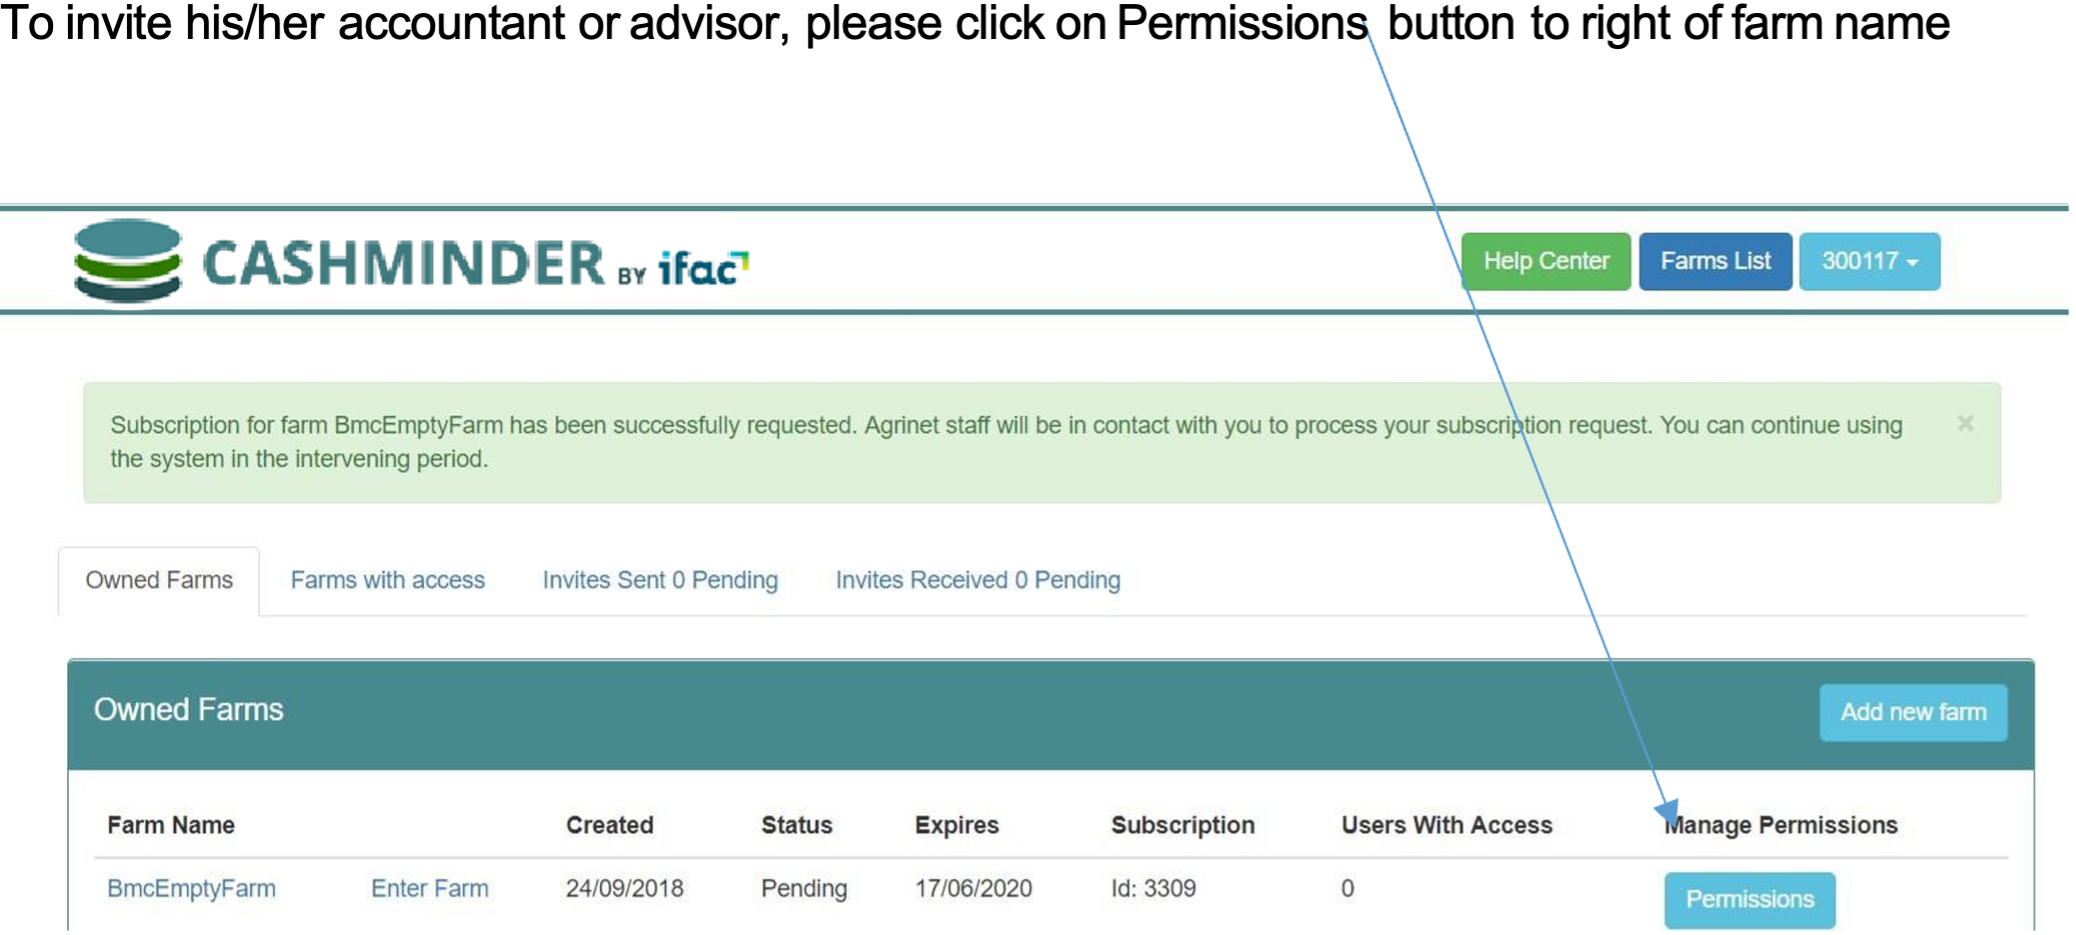
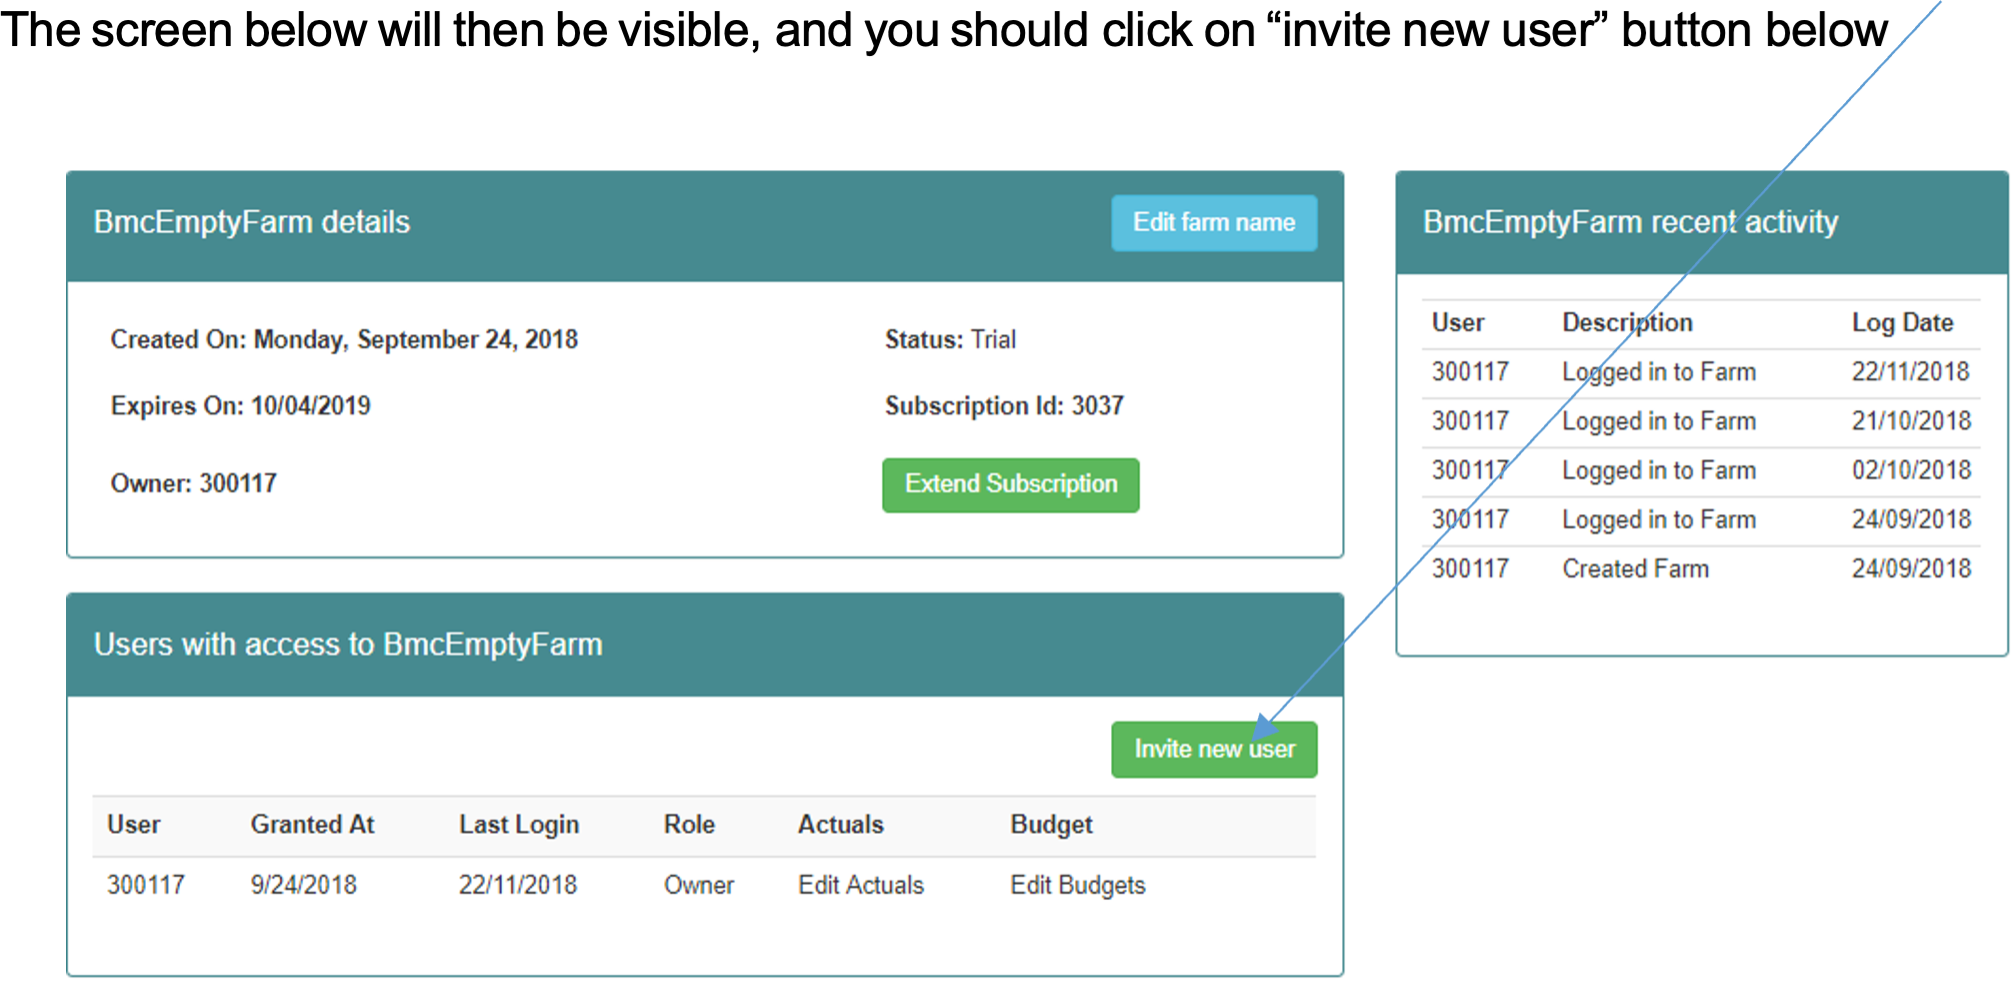
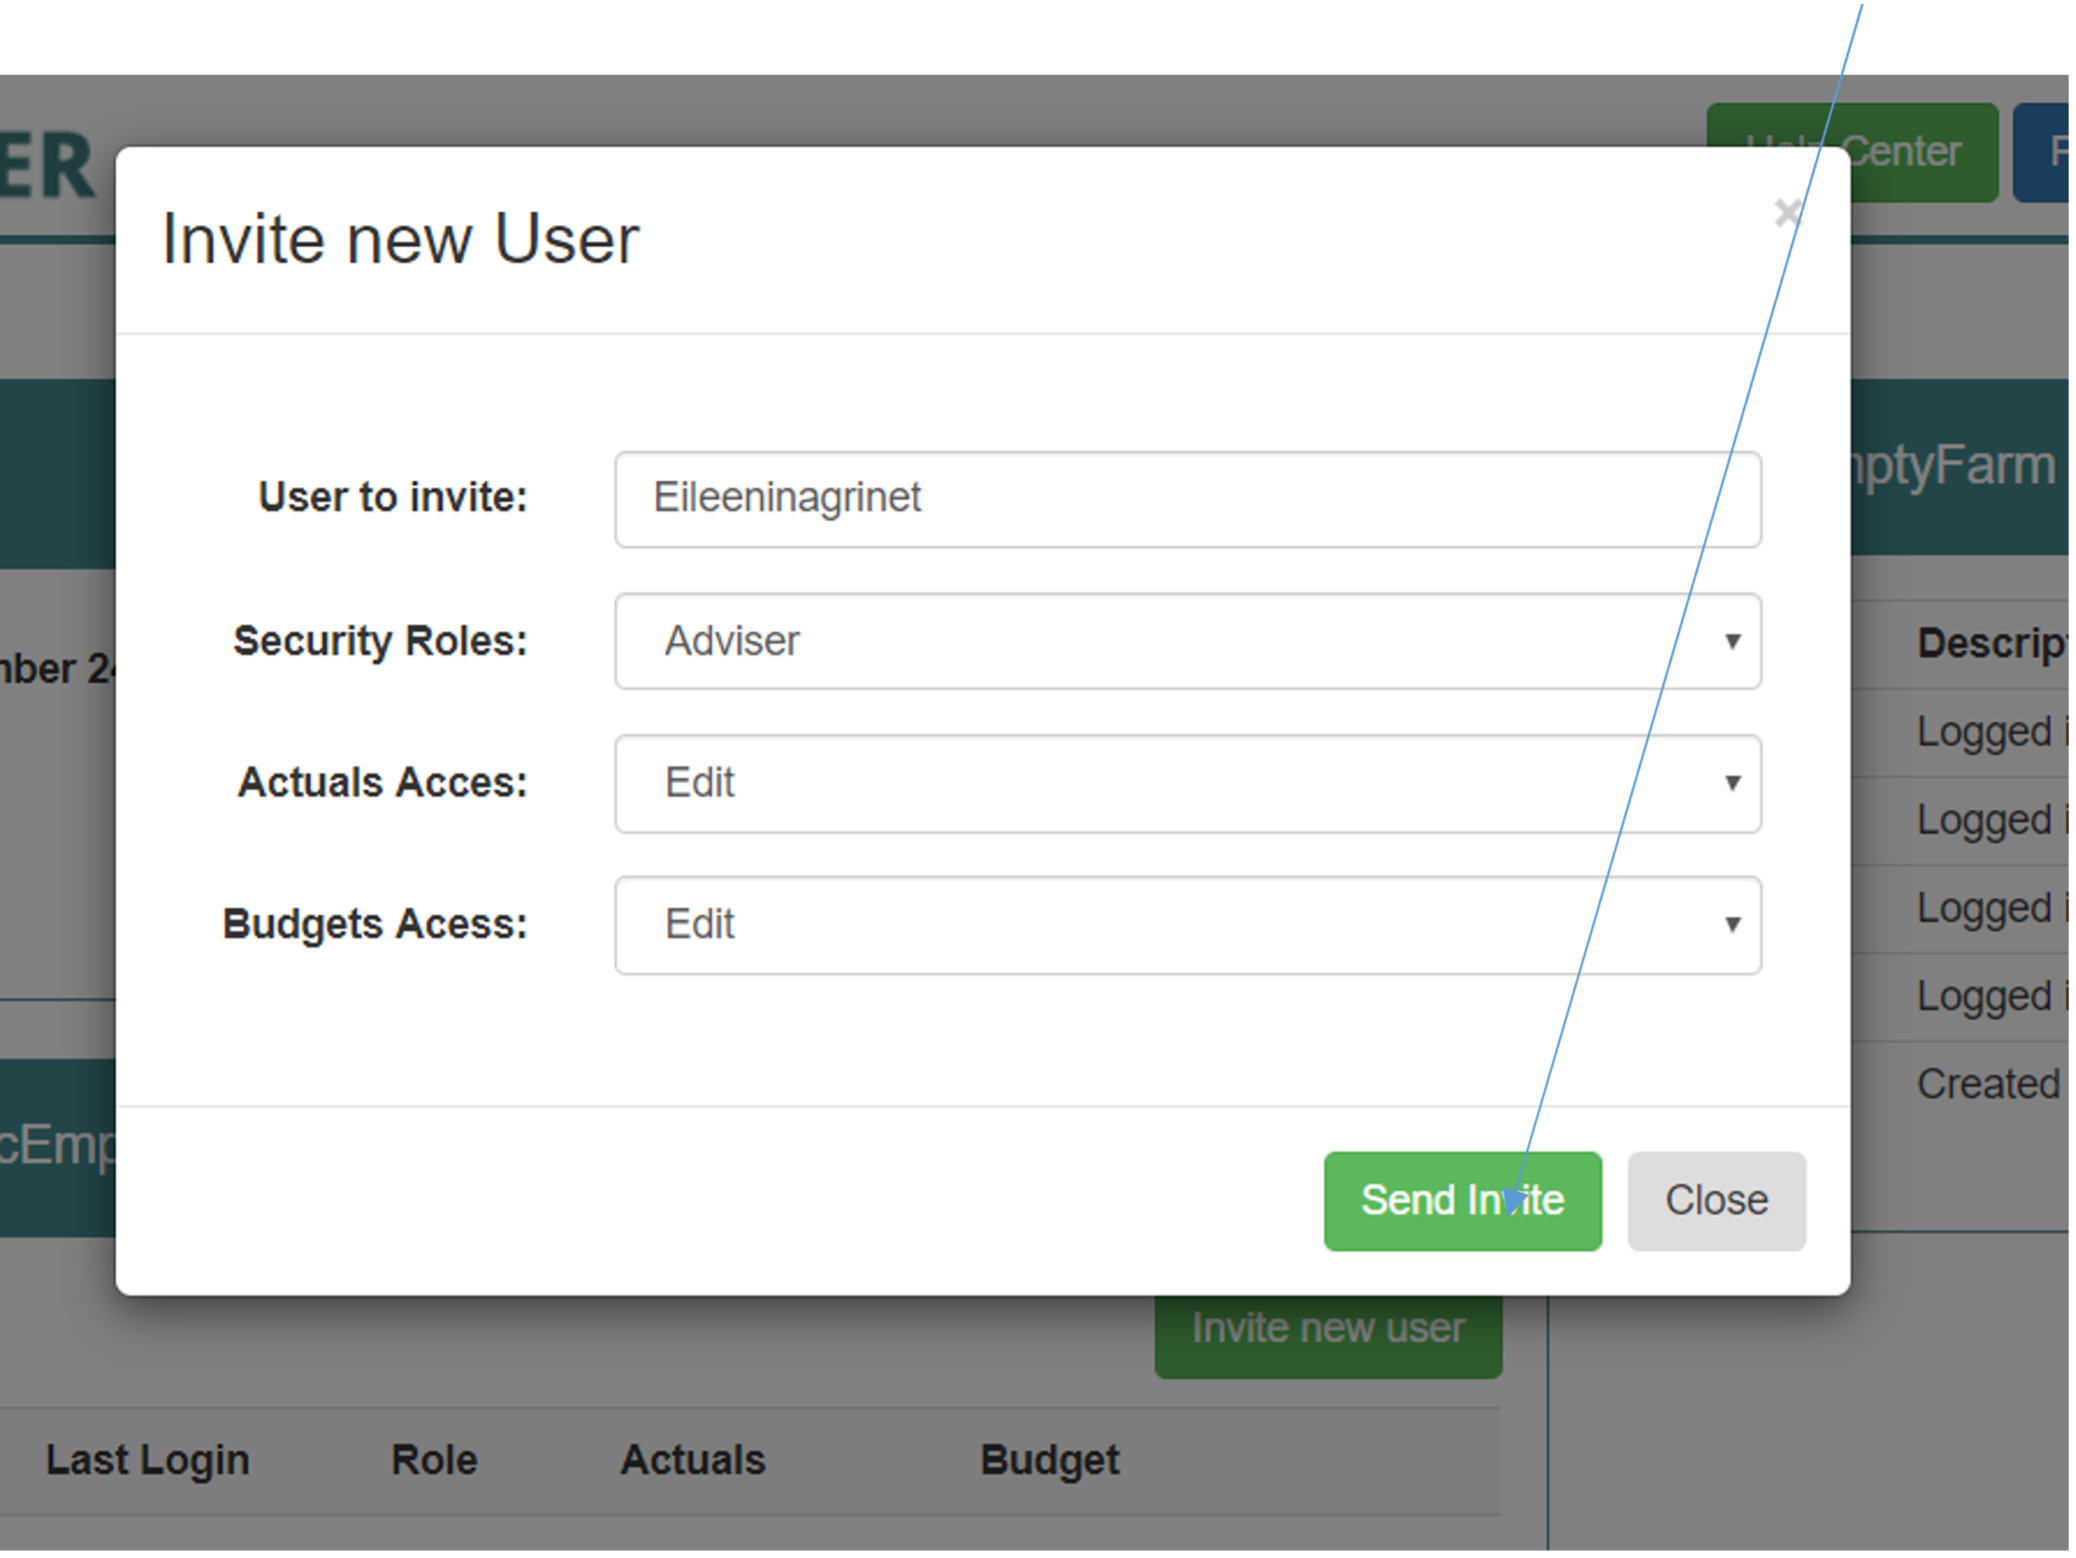
The accountant / advisior you are inviting to access your data, must already have signed themselves up in Cashminder and given themselves a “username” in Cashminder, which will probably be their email address.
Enter this username in the box “user to invite”.
You should give the accountant the security role of “Adviser” (the other option here is partner, where the farmer is sending an invite to his farm partner. This partner would be able to invite someone else to see the farm data, where as an advisor cannot do that)
As owner of your farm data, you can decide whether to give your accountant/ advisor either edit rights or view rights (only) to your data, at your discretion. If you do give “edit” rights, any changes that your accountant makes to your data will be recorded. Hit “Send invite” button below
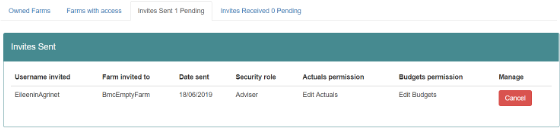
Once you send the invite, when you return to the Farms list screen , you will see that there is 1 invite
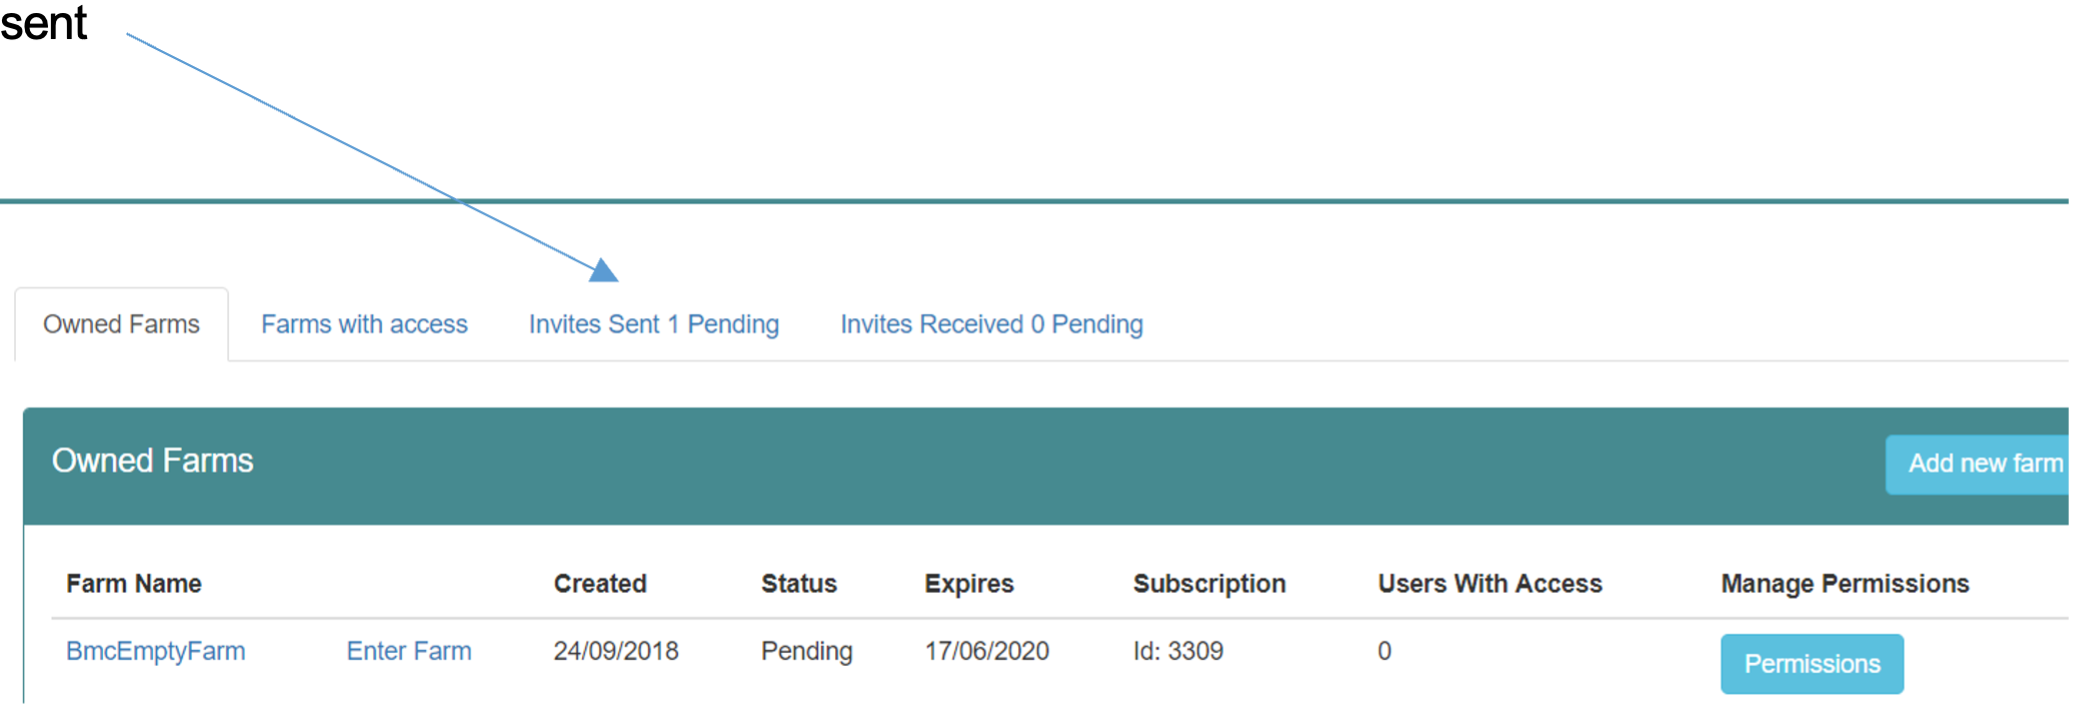
If you click on this page, you will see details of the Invitation issued below, and as you can see , you have the option to cancel this invitation.
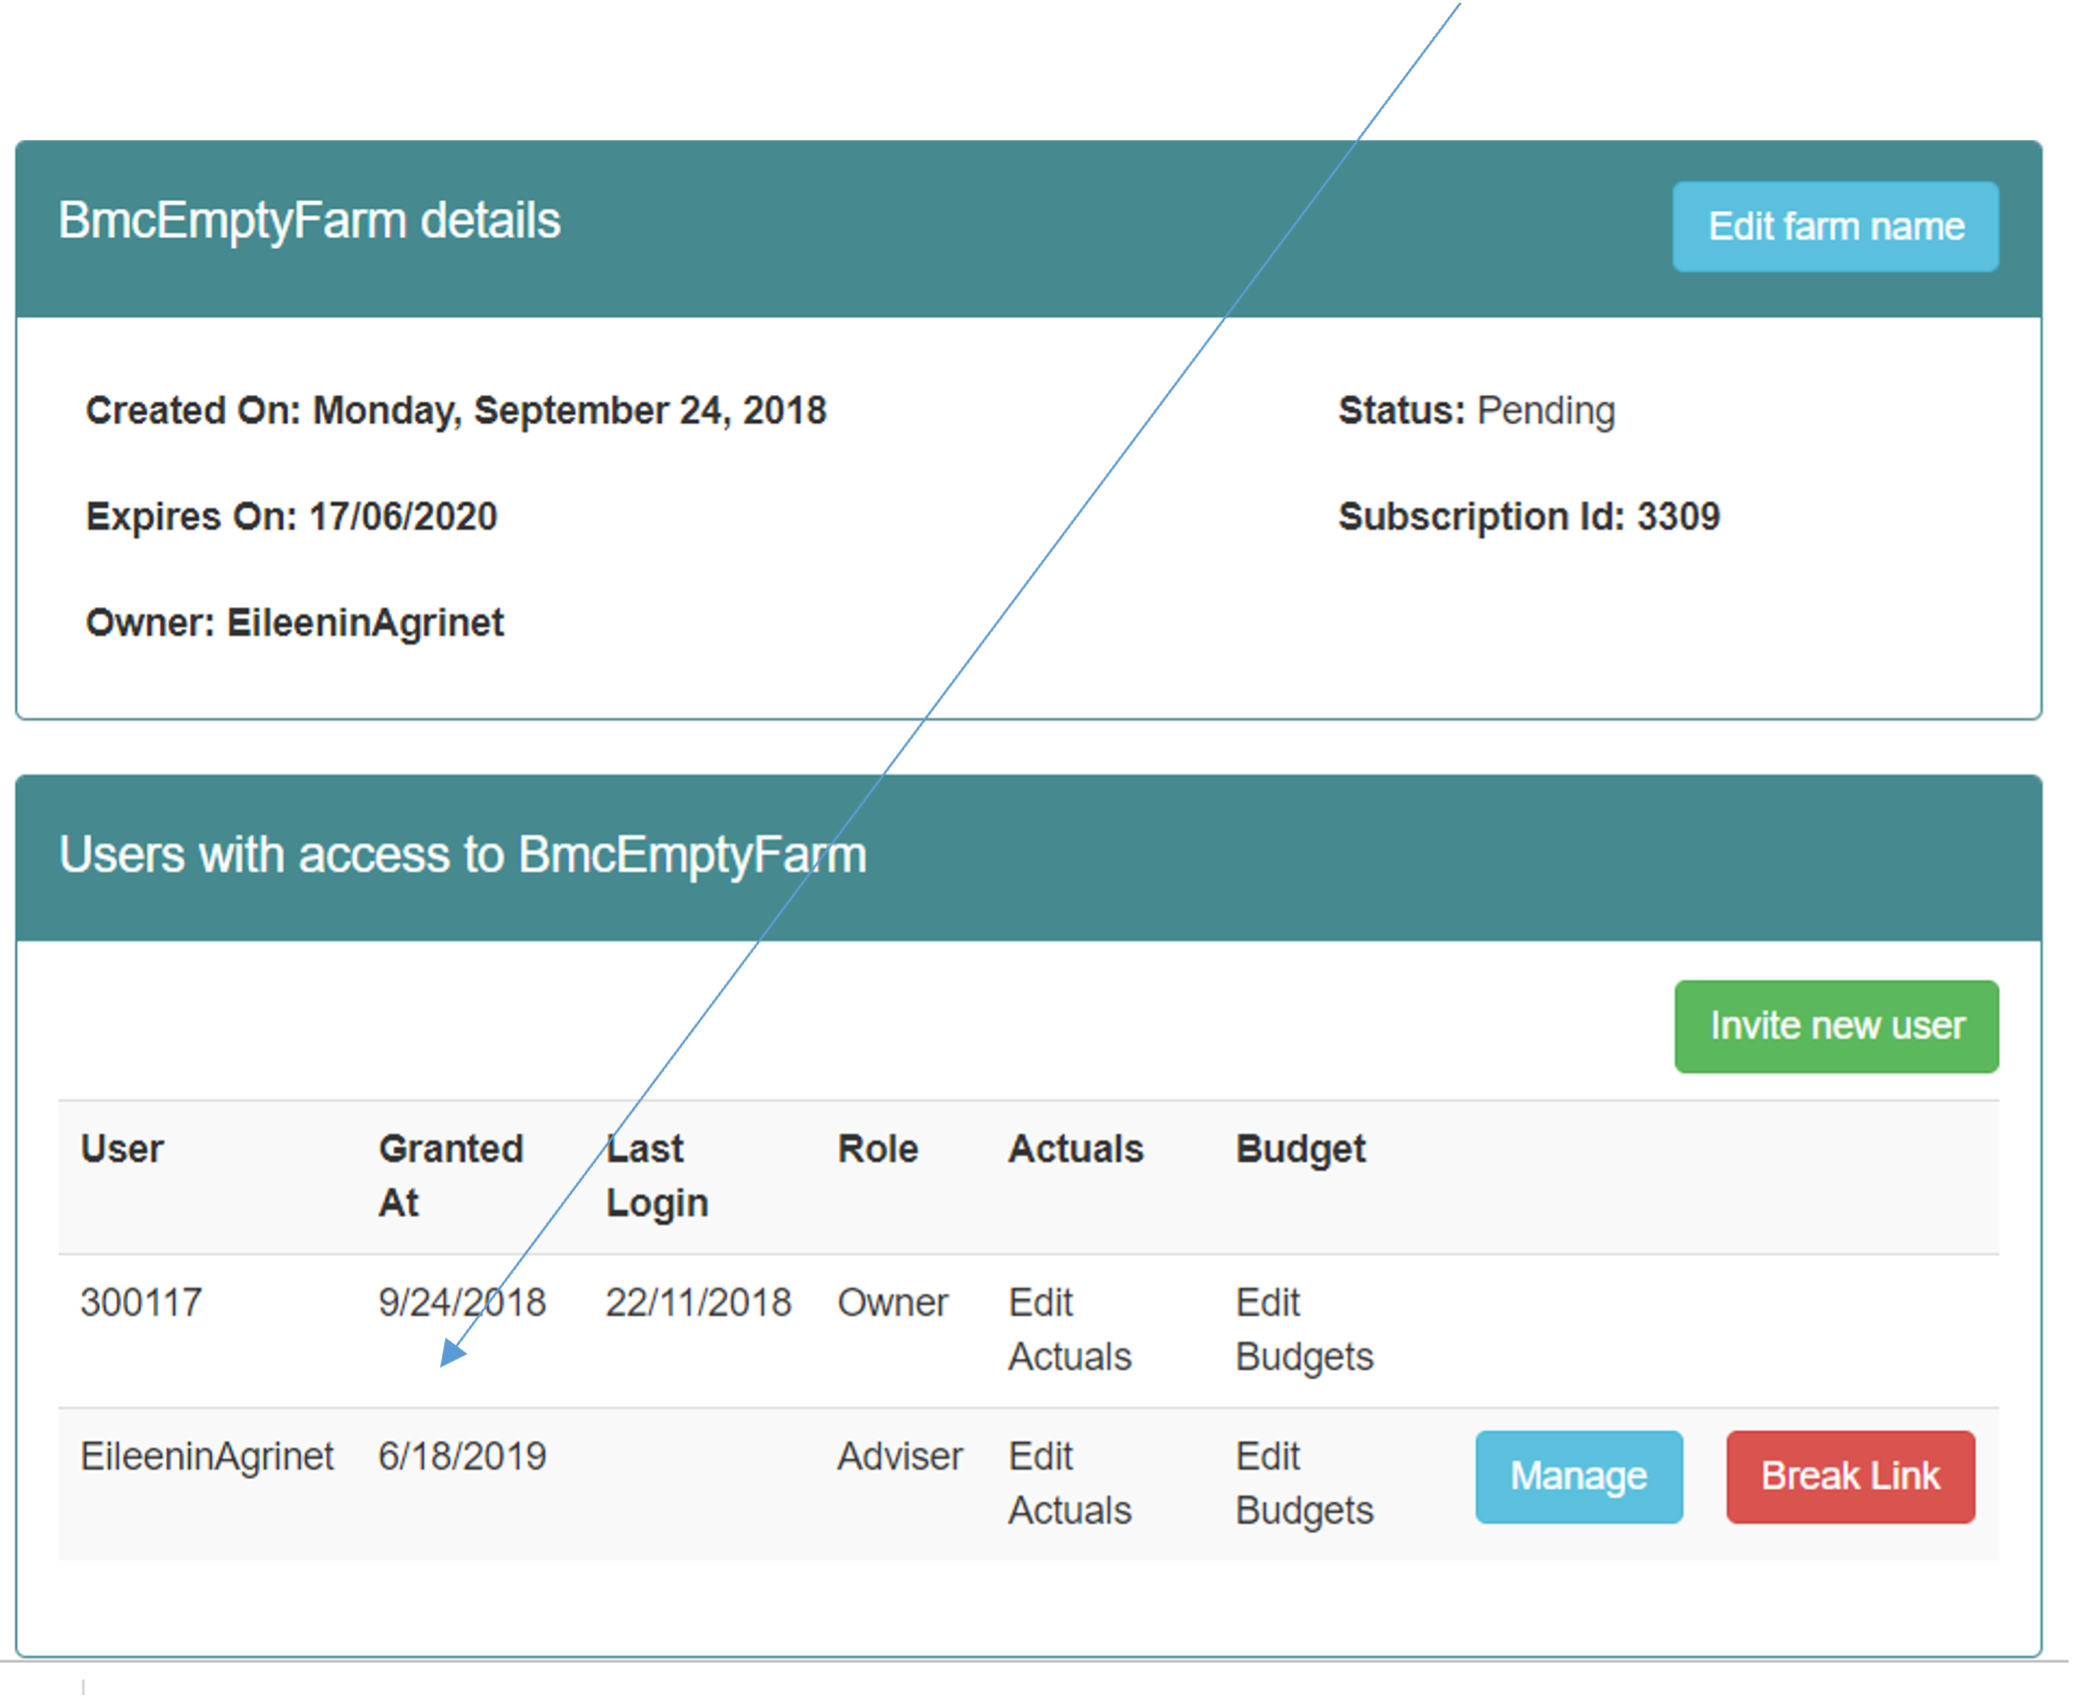
When your accountant logs into Cashminder, they will that they have Received an invitation and once they accept that invite, when the farmer logs in again, they now see that their accountant has a connection to their farm, which they can break at any time. See below:
Dairy input sheet help
1. Farm Details
Herd identifier
Enter herd IE number in this box.
Year End Date
Enter the year end date for the year in question e.g. 31/12/2011 for the year 2011.
Production Type
This box must be completed. Choose a production type from the following list:
Spring Calving - Calving start before Jan. 31st
Spring Calving - Calving start after Jan 31st
30 % Autumn Calving (or less)
30% - 60 % Autumn Calving
60% Autumn Calving (or greater)
Registered for VAT
Enter ‘Yes’ or ‘No’
Av no of unpaid Labour hours per week
Enter in the average number of hours worked by farm owner & family labour (partner, children). These hours are charged at a standard charge per hour, this can be changed. This is used to calculate Return for Capital & Management. This represents the return to the farm owner for having money tied up in farm assets and also represents his reward for his management of the farm business
The Total Labour Hour Charge & Return for Capital & Management figures appear on the whole farm reports only
Land Details
Enter adjusted hectares of usable land as per SFP application form. Exclude any area under yards, roadways etc. Divide the land area into area owned and leased and also into forage and tillage areas. Leased land includes land taken on a short-term basis (conacre, short-term grazing) and long-term leases (e.g. three year lease). The total cost of all leased land should be entered (divided between forage and tillage land as appropriate).
The white boxes must be filled; there is an optional enterprise breakdown. If the enterprise breakdown boxes are not filled, the computer programme will allocate the land area to each enterprise on a livestock unit basis.
The forage area must be divided into the area under grass, maize, whole crop and forage root crops (e.g. fodder beet). Maize, whole crop and forage root crops (e.g. fodder beet) are treated as forage crops and therefore any costs associated with growing these crops must be included with the normal grassland costs.
The tillage area must be divided into the area under cereals, sugar beet, potatoes and forage crops for sale (e.g. fodder or sugar beet grown for sale, whole crop wheat grown for sale).
Dairy Milking Platform ha
This is the area of land (ha) around the milking parlour that cows can physically walk to each day. Currently, part of this land could be for rearing replacements, cattle or in tillage. In some parts of the country this area is for cows only, replacements and silage is confined to outfarms.
Milking platform area is the potential milk producing capacity of the farm.
Quota Details
Enter details of milk quota owned and leased (both short and long term). Details should be taken from the final milk statement for the 12 month period – usually the December milk statement.
The total cost of the leased quota should be entered.
2. Sales and Direct Payments
Milk Sales
Enter the total volume of milk sold in the 12-month period being analyzed and the volume of milk fed to calves/ used in the house in the same period.
The net value of milk sold should be entered – this equals the total gross value of milk sold during the year less statutory levies. Net milk value is clearly identified on most milk statements.
Details of the annual average fat %, protein % and SCC must also be entered (this information can be got from the December milk statement in most co-op areas).
Direct Payments
Single Farm Payment – enter the total value of the SFP received on your farm in respect of the year in question (e.g. 2011).
REPS € - enter any REPS payments received during the year in question.
Compensatory Allowances - enter any Area Based Compensatory Payments (old Disadvantaged Area payments) received during the year in question. Also enter any other farm income such as sale of hay, VAT refund etc.
The specific dairy, cattle and sheep premia boxes are for any payments specific to these enterprises e.g. Suckler Cow welfare scheme payments are expected to be paid from December 2008. There is no specific dairy or sheep payment for 2008.
Tillage farmers with set-aside entitlements should enter the value of the specific set-aside entitlements in the box marked ‘Setaside Ents. & Tillage Premia’.
Livestock Transfers
Enter the number of animals transferred on the farm during the year; standard transfer values are assigned by the computer (the values are listed under point 8 in this document).
Calves to Replacements – number of dairy replacement calves transferred from the dairy enterprise to the replacement enterprise during the year. For a spring calving herd this can equal the number of replacements 0 – 1 at the end of the year.
Calves to Cattle – number of non-dairy replacement calves transferred from the dairy enterprise to the cattle enterprise during the year. These can include all male calves and also non-dairy replacement female calves. For a spring calving herd this can equal the number of cattle 0 – 1 at the end of the year.
Replacements to Dairy Cows - number of dairy replacements transferred from the replacement enterprise to the dairy enterprise during the year (in-calf heifers that calve into the dairy herd). For a spring calving herd this can equal the number of replacements 1 – 2 at the start of the year.
Cattle kept as suckler cows – number of cattle 1 - 2 year olds kept as suckler cows.
Tillage Sales
Enter the total value of all tillage crops sold off the farm during the year. Include a value for crops still in the ground and a value for home grown crops fed (or retained and due to be fed) to livestock on the farm.
Other farm Income
Any small sales of product, such as some silage or bales of hay should be included here. Also include any small contracting receipts. Large scale sale of hay/silage should be treated as a separate enterprise with its own input costs and sales. Similarly where a lot of contracting is taking place- costs must be adjusted to account for inputs used in the contracting business.
Stock Bull Usage
Stock bull usage must be allocated between the dairy, replacement and cattle (suckler) enterprises. The total must not exceed 100%.
A useful way of allocating the bull usage is on the basis of the number of heifers versus the number of cows in calf to the stock bull.
The percentage usage figure will only have an effect if a stock bull is purchased or sold during the year (or if there is an inventory change). The percentage usage figure is then used to allocate a proportion of any sales, purchases or inventory changes to either the dairy or replacement enterprises.
3. Livestock Details
You must enter opening, closing and average stock numbers in the following categories:
dairy cows, suckler cows, stock bull, replacements 0 – 1, replacements 1 – 2, replacements 2+, cattle 0
– 1, cattle 1 – 2, cattle 2+, ewes, rams, stores/ hoggets, lambs.
You must also enter the value of livestock sales and purchases under the same categories; while not necessary to enter the numbers of animals purchased or sold, it is strongly recommended.
The average numbers should be calculated with reference to the monthly stock table; the average number refers to the average over the twelve month period and not simply the average of the opening and closing values. Farmers are recommended to complete the monthly stock table for their farm.
Standard values are assigned by the computer (see point 8 later); it is recommended that these values are used.
There is a box to record new-born calf sales; the purchase of calves should be recorded as either replacement 0 – 1 or cattle 0 – 1 purchase.
Net sales and purchase figures should be used i.e. net of levies.
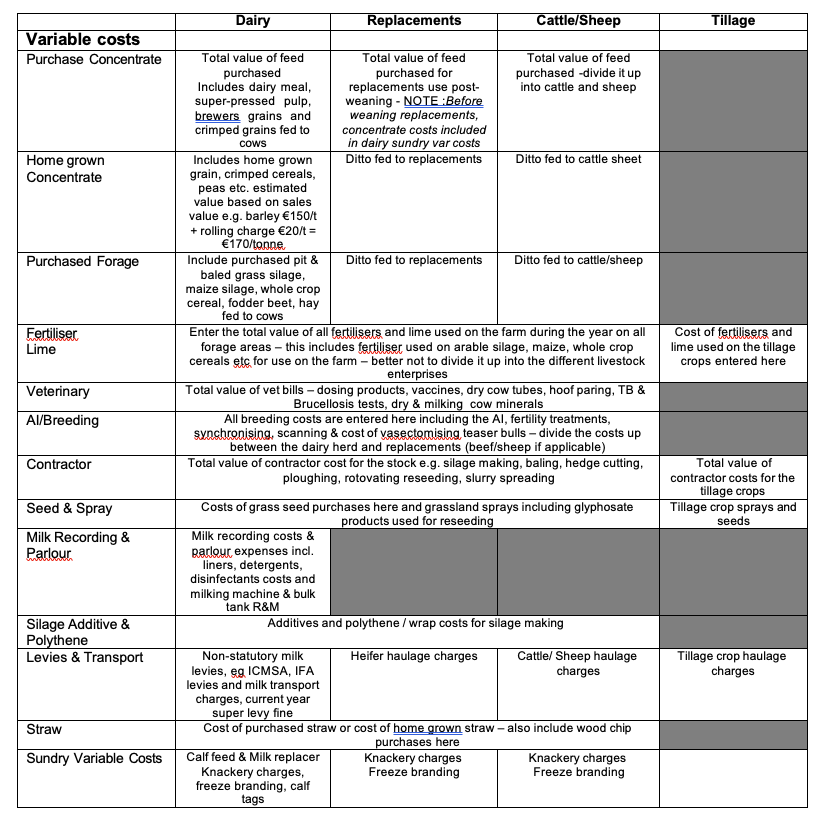
4. Variable Costs
Purchased Feed
Enter total value € of all feed purchased for use by dairy cows, replacements, cattle and sheep during the year.
Include any feed used for feeding dry, milking or cull cows under dairy feed. Super-pressed pulp, brewer’s grains and crimped grain are all concentrate replacements and should be entered here.
Calf feed and milk replacer should be entered under ‘Sundry Variable Costs, Dairy’.
Example:
Total dairy feed purchased
15 tonnes @ €190 / t = €2,850 (enter in ‘dairy’ box)
Total cattle feed purchased
15 tonnes @ €160 / t = €2,400
Stock
40 0 to 1 year olds (10 Fr females)
40 1 to 2 year olds (12 Fr females)
10 Fr females received 1.4 kg/day for 130 days (Spring & Autumn) = 1820 kg 12 Fr females received 1.5 kg/day for 60 days (Spring & Autumn) = 1080 kg
Total purchased feed for replacements = 2900 kg = 2.9 tonnes
Cost of 2.9 tonnes feed = €464 = purchased replacement feed (enter in ‘replacement’ box) Therefore balance = €1,936 (€2,400 - €464) = purchased cattle feed (enter in ‘cattle’ box)
Home Grown Concentrates
Enter total value € of all home grown concentrates for use by dairy cows, replacements, cattle and sheep during the year. Include here home grown rolled cereals, crimped cereals, peas etc.
Do not include a value for silage, maize silage, whole crop cereals in this box. The cost of growing these forage crops should be included under the stock headings below – fertilizer, contractor, seeds and sprays.
Purchased Forage
The total value € of purchased silage, hay, maize silage, whole crop cereal or fodder beet etc, should be entered here. The total bill must be divided between dairy, replacements, cattle and sheep as appropriate.
Farm Fertiliser - Stock
Enter the total value € of all N, P, K fertilizer used on the farm during the year on all forage areas – this includes fertiliser used on arable silage, maize, whole crop cereals, fodder beet grown for use on the farm. There is an option to divide the fertiliser bill between the three enterprises on the farm but it is probably better to enter the fertiliser bill as a total figure for the farm; the computer will then allocate the total figure on a LU basis.
Farm Fertiliser - Crops
Enter the total value € of all N, P, K fertiliser used on the farm during the year for all tillage crops.
Lime
Enter the total value € of lime spread on the farm during the year; divide as appropriate between stock and tillage.
Farm Veterinary
Enter the total value € of the veterinary bill for the farm. Include monies paid to local veterinary surgeon as well as monies spent on dosing products, dry cow tubes etc at local co-op or Agri-Store.
Dry cow minerals should be included here (as should any powdered minerals).
Also include here the cost of hoof paring, annual TB and Brucellosis test and vaccinations.
It may be possible to divide out the cow costs and apportion the remaining costs on a livestock unit basis (optional enterprise breakdown). Alternatively enter a total figure and the computer programme will allocate costs on a livestock unit basis.
AI / Breeding
Enter the total value € of the AI bill for the farm. If AI fee is paid through the co-op, this figure will be on the monthly milk statements. The bill must be divided between the dairy and replacement enterprises.
The cost of scanning and any fertility treatments used on the farm should be included here (and not under veterinary). Also include the cost of a vasectomy treatment (if appropriate).
Farm Contractor Costs
Enter to total value € of the contractor bill for the farm – the bill must be divided between stock and tillage. Include here the cost of silage contracting, slurry spreading, baling, ploughing, other cultivations, hedgecutting etc.
Milk Recording & Parlour
The total figure is entered under ‘Dairy’. Include the cost of bulk tank and milking machine repairs
and maintenance, milk recording and dairy supplies.
Levies & Transport
Include non-statutory milk levies (e.g. IFA, ICMSA levies) and any milk transport charges under ‘Dairy’. Allocate any cattle haulage charges to the relevant animal category.
If a Super Levy fine applies to the year in question, it should be entered under ‘Dairy’.
Straw
Enter the cost of any straw purchased. Or retained on the farm if there is a tillage operation – the same figure must be included under tillage sales.
Sundry Variable Costs
Include the cost of calf feed and milk replacer under ‘Dairy’ (i.e. any feed used to rear calves to 8 weeks of age). Calf feed purchased for calves older than this is either cattle feed or replacement feed. If completing e-Profit Monitor for the calendar year for a spring calving herd, any calf feed purchased up to May 1st can be entered here (as a rule of thumb).
Other examples of Sundry Variable Costs are:
- Calf tags – dairy
- Freeze branding – replacements Knackery – appropriate animal category.
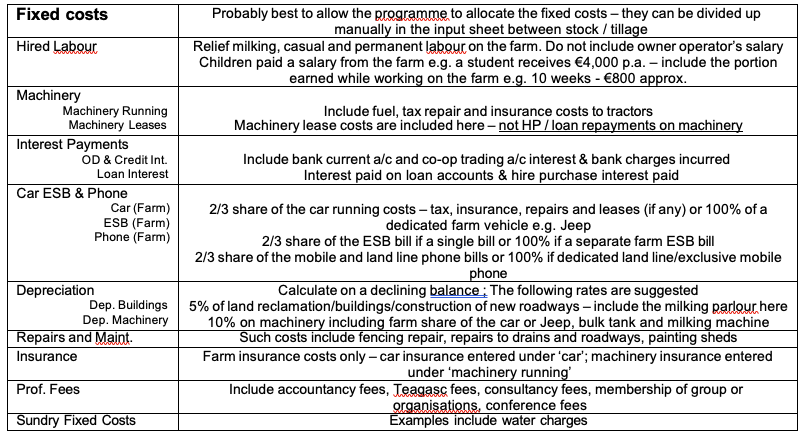
5. Fixed Costs
Hired Labour
Enter the total value € of the labour bill on the farm for the year; divide between stock and tillage. Include here the cost of permanent labour, part-time and casual labour.
Include monies paid to Farm Relief Service (apart from that paid for hoof-paring; this is allocated to Veterinary).
If family labour is paid i.e. son or daughter, include only the money paid to cover the time spent on the farm e.g. son paid €4,000 per year who is attending University. He spends 10 weeks a year working on the farm. Therefore one-fifth of the money paid should be included as labour i.e. €800.
Farm Machinery Costs
This heading is divided into running costs and lease costs.
Enter the total value € of the machinery running costs on the farm for the year – include fuel, repair, tax and insurance costs.
Any lease payments paid during the year should be entered under ‘Machinery Leases’. Loan repayments (including HP payments) made on machinery should not be included under ‘Machinery Leases’; the interest portion only of such payments should be included under the ‘Loan Interest’ heading.
Farm Interest Payments
This heading is divided into overdraft & merchant credit interest and loan interest.
Overdraft & merchant credit interest – bank current a/c and co-op trading a/c credit interest – total for the year less any discount interest received. Include any bank charges incurred here.
Loan interest – interest paid on all loan accounts during the year; this includes hire purchase interest paid.
Car, ESB & Phone
This heading is divided into car, ESB, phone.
Use the farm share of these three items i.e. 2/3 rds share.
Car - includes tax, insurance, running costs, repairs and leases (if any). If there is a jeep (or specific farm car) on the farm, you can use 100% of all jeep costs and ignore the costs associated with the private car.
ESB – include total ESB bill for the year. Phone - don’t forget the mobile phone bill.
Depreciation
This heading is divided into depreciation on buildings and depreciation on machinery. The following rates are suggested:
Machinery 10%
Car, Jeep 10 % (include farm share only)
Milking Machine and Bulk Tank 10%
Land Reclamation 5%
Buildings 5%
Depreciation should be calculated on a straight line basis i.e. depreciation should be calculated as a percentage of the net purchase cost (net of VAT and any grants that might apply)
Repairs and Maintenance
Include the total cost of any maintenance carried out on the farm during the year. As a rule of thumb, If VAT has been reclaimed on the expenditure, then the expenditure should be considered as a capital expenditure. It should be entered as an investment in buildings in the Balance Sheet.
Insurance
Enter the cost of farm insurance here. Car insurance should be entered under ‘Car’ while machinery insurance should be entered under ‘Machinery running costs’.
Professional Fees
For example, accountancy fees, Teagasc or consultancy fees, discussion group membership fees, conference fees etc.
Sundry Fixed Costs
For example water charges, sundry fixed items, small power tools etc.
Optional Fixed Cost Allocation
Fixed should be divided between stock and tillage. There is an option to select up to 3 fixed costs for and allocate them to individual livestock enterprises e.g. Depreciation on cattle housing allocated directly to cattle.
6. Balance Sheet
You must include details of assets and liabilities at both the start and end of the year as well as the amount invested under the various asset headings during the year.
If you completed a Profit Monitor last year, the opening balances should equal the closing balances from last year. Alternatively, if your farm accounts are prepared for the same period as your Profit Monitor analysis, the opening balances can be taken from the farm accounts (closing balance).
Assets
Include land, quota, SFP entitlements, buildings, machinery (including car, jeep), dwelling house, investments, pension, debtors and cash on hand. The size of the milk quota at the beginning and end of the year should be entered (see your co-op milk statement); the value of any quota purchased should be entered under the column headed ‘Net Invested’.
Standard values are suggested for land and quota (see below). The depreciation figures are as per the Fixed Costs.
Liabilities
Include the balances on all loan accounts (farm and non-farm) as well as merchant credit and bank overdraft balances at both the start and end of the year in question.
Don’t forget the balances on the milk quota loan accounts.
Debtors and Cash on Hands
Include any positive bank account balances as well as money owed to you (debtors). Enter the figure for both the start and the end of the year.
The main debtors on most spring calving dairy farms will be the milk co-op (outstanding milk cheque) and the Department of Agriculture (outstanding SFP).
Stocks (other than animals)
An estimate of the value of feed, forage, fertilizer, crops, seeds and sprays on hand at both the start and end of the year should be entered. This is especially important if there is a change in the value of stocks held during the year (inventory change) e.g. less silage on hand at end of year than at start of year.
New Capital Investments
Include any capital investments made on the farm during the year – under the column headed ‘Net Invested’. The figure entered should be the net value of any investment made.
7. Dairy physical data
This section deals with the physical performance of your farm. It will not affect the financial analysis of your farm. It purpose is to try and help understand different financial performances and is best used when comparing farms in a group situation.
Enter date of start of calving, end of calving, total calvings and number of calvings in Feb/march. E.g. started calving on 25/1/08, had 60 cows calved by 13/3/08 and ended calving on 25/4/08. Start of calving is when cows/heifers calve to full term pregnancies.
Enter the most previous herd EBI from Herdplus report.
Silage cutting dates and hectares should include round bales as well. E.g. fist cut could be 25ha in total, 10ha on milking platform, 10 ha on out farm and 5 ha of round bales cut around the same period from the milking platform.
8. Frequently Asked Questions
Question:
What about the costs associated with growing forage crops for use on the farm e.g. maize, whole crop wheat etc?
Answer:
Enter the costs under the appropriate stock heading. For example, enter maize fertilizer under ‘Stock Fertilizer’ and maize contractor under ‘Stock Contractor’.
Question:
What about disease compensation grants?
Answer:
TB and Brucellosis Compensation Grants should be included under the appropriate category of livestock sales.
For example, if reactor compensation of €800 is received in respect of the sale of one cow (€550) and one weanling (€250), then cow sales should be increased by €550 and cattle sales by €250.
The monthly income supplement should be included under “REPS and Other Farming Income”.
Question:
What about forestry premia payments?
Answer:
These should be excluded (as the land under forestry is not considered for this analysis).
Question:
What about off-farm income, dividends etc?
Answer:
These should be excluded.
Question:
If a farmer leases milk quota to the co-op or leases suckler / ewe quota to another farmer, where should that income be recorded?
Answer:
Monies received for leasing milk quota to the Co-op (temporary leasing of unused quota) should be included under “REPS and Other Farming Income”. Likewise for income received for the lease of suckler / ewe quota to another farmer.
Question:
I purchased a new tractor in 2006 – the cost to me was €35,000. I signed a hire purchase agreement with my local bank – I will repay this over 7 years and the total cost to me will be €42,000. I made the first annual repayment of €6,000 during 2006. How should I show this on Profit Monitor?
Answer:
There are a number of entries to be made as follows:
i. Increase the asset value of machinery by €31,500 (the value of the new tractor less 10% depreciation). Enter the figure under the ‘Net Invested’ column.
ii. Enter €3,500 under depreciation (increase the existing figure by this amount).
iii. The annual cost of the hire purchase is €1,000 – calculated as (€42,000 - €35,000)/7 – this must be entered under ‘Farm Interest Payments – Loan Interest’.
iv. The balance owed on the tractor hire purchase at the end of the year is €30,000 – calculated as
€35,000 - €5,000, where €5,000 is the principal paid during the year - this must be added to the closing balance of ‘Loans (Farm)’.
Question:
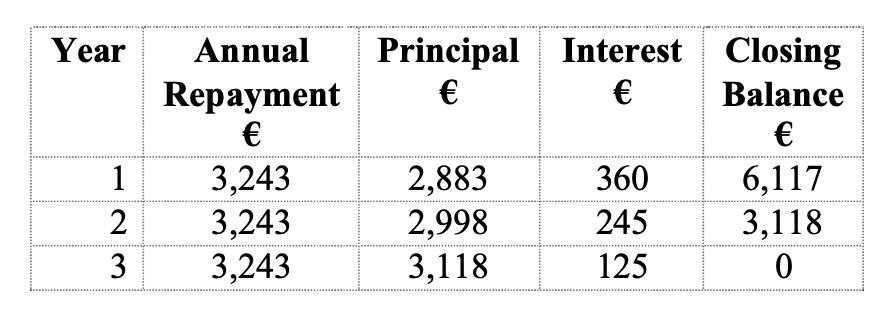
I purchased 50,000 litres milk quota during the year – this cost me €9,000. In order to pay for it, I took out a loan with my local bank at 4% interest over 3 years. I made my first annual repayment of €3,243 during 2006. How should I show this on Profit Monitor?
Answer:
Again there are a number of entries to be made:
i. Increase the value of milk quota by €9,000 (the value of the additional milk quota). Enter the figure under the ‘Net Invested’ column.
ii. The purchase of milk quota is written off over 7 years (14.3% per year). Therefore a figure of
€1,287 should be entered under depreciation.
iii. In 2006 (Year 1 of the loan), you made a repayment of €3,243. The interest portion of this was
€360 – this must be entered under ‘Farm Interest Payments – Loan Interest’.
iv. The balance owed on the milk quota loan is €6,117 - this must be added to the closing balance of ‘Loans (Farm)’.
Question:
I made a bid to buy 60,000 litres milk quota at 15 cent per litre (€9,000) on the Milk Quota Exchange in winter 2008. I won’t know if I have been successful until January 2009. How should I deal with this on my Profit Monitor?
Answer:
This should not appear on your 2008 Profit Monitor. You will not own the additional quota (if successful) until 1/4/2009. The balance on your Current Account will not be affected until the Exchange is completed – also in 2009.
You can enter this as a New Investment in milk quota on your 2008 Profit Monitor; if you organize a loan to pay for it, you can follow the steps outlined in the previous question.

The example in the above table refers to a loan of €50,000 for 7 years at 4% interest. Monthly repayments of €683.44 are made, giving a total annual repayment of €8,201.28. In Year 1, this is made up of €1885.04 in interest payments and the balance €6,316.25 in principal repayments. The breakdown between principal and interest payments will differ for each year of the loan.
Many farmers are now buying machinery on a hire purchase agreement – details of the hire purchase should be entered here.
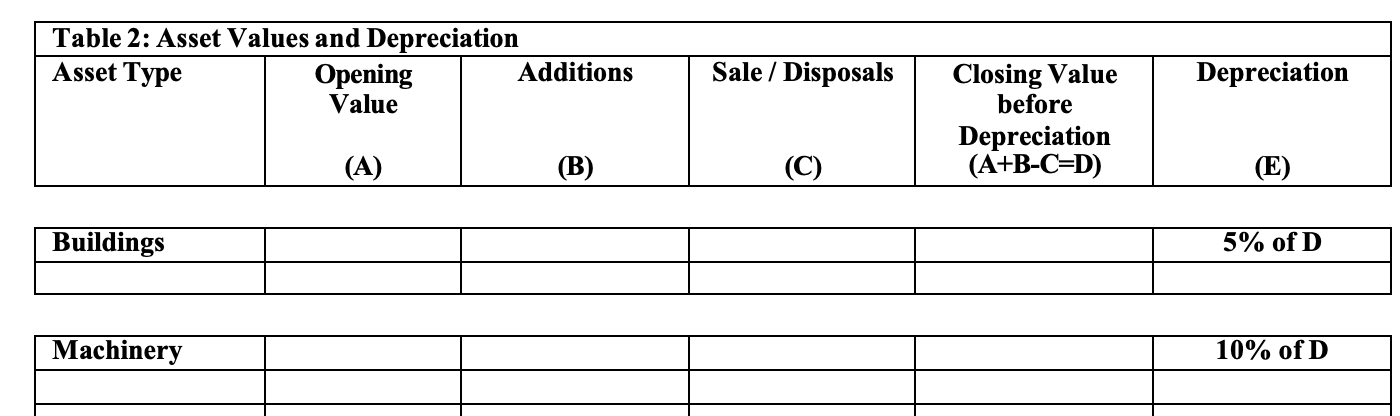
List all buildings and machinery on the farm at the start of the year and establish a value on each (from farm accounts or estimate of market value for machinery). Enter the net value of all additions in column B. In the case of buildings the net value equals the total cost of the building less any grants received and VAT reclaimed. In the case of machinery the net value equals the total cost less any trade in allowance received.
Completing the eProfit Monitor Input Sheet – summary guidelines
Allocation of variable costs is outlined in the following table
Allocation of the fixed costs is outlined in the following table.
Production type
This box must be completed for the relevant year. Types 1& 2 are pre- or post-31st January start of calving spring ilk production systems. Types 3, 4 &5 are for winter milk herds with <30%, 30-60% or >60% of the cows calving in the Autumn (after July 1st).
Milk sales
Enter the total volume of milk sold on the farm for the 12-month period being analysed. The net value of the milk entered – the total gross value of milk sold less statutory levies. Details of the annual average fat & protein % and SCC can be obtained from the Co-op Performance report – your adviser will be able to access this report if he has access to your farm details on the ICBF website.
Livestock numbers
The numbers of the various categories of livestock should be accurately recorded for your farm. Your adviser will be able to access this data if your are in Herd Plus and your adviser has access to your farm information on the ICBF website.
Stock bull usage
Where a stock bull is retained on the farm, the simplest way to calculate percentage usage is to determine the number of calves he sired in the relevant year and allocate his usage on a % basis e.g. a farms two stock bulls sired 50 calves in 2011: 15 were born to dairy cows, 5 to replacement heifers and 30 to suckler cows. The stock bull usage is 30% to dairy cows, 10% to replacement heifers and 60% to suckler cows.
Contract Rearing of Heifers
a) All heifers reared off-farm: “sell” heifers from the dairy herd for €300. This is the same value as if heifer calves were transferred to a replacement enterprise on the existing farm.
When heifers are returned to the dairy farm, they are valued at €300 (initial cost of calf) plus the cost of having this animal contract reared. So, if heifers are contract reared at a charge of
€1 / day, and are off-farm for 600 days then these heifers are “purchased” into the dairy herd for €900 (€300 + €600).
e.g., 100 cow herd rearing 30 replacements off-farm - 30 “sold” from dairy herd @ €300 each.
30 “purchased” into dairy herd @ €900 each.
To avoid inventory changes, these animals should be purchased in the year that they calve, i.e., January / February. There should be no replacement heifer enterprise in this scenario, all fixed costs are carried by the dairy herd.
b) Some heifers reared off-farm: Again, “sell” these heifers from the dairy herd. “Purchase” back using the same example above as a guide. Heifers that are reared on the home farm will be transferred back into the herd at €1,000 as normal. In this scenario, some fixed costs will be carried by the replacement enterprise.
c) All reared off-farm with inputs (e.g., fuel / feed, vet) purchased by dairy farmer: “Sell” and “Purchase” these animals as above. The purchase price must include the price paid to the reared plus the cost of inputs required to rear the heifers.
e.g., 30 replacements “sold” to reared. 30 replacement “purchased” at cost of
€300 - calf transfer value
€300 - reared charge
€250 - fert. meal, etc.
€850
https://eur01.safelinks.protection.outlook.com/?url=https%3A%2F%2Fwww.teagasc.ie%2Frural-economy%2Ffarm-management%2Ffinancial-analysis%2Ffarm-profit-analysis%2Fteagasc-profit-monitor-support-resources%2F&data=05%7C02%7Csiobhaneklund%40ifac.ie%7C38ec730772354890c1c408dda507531f%7Caa98d3b14d2540f180edbfde253e19ac%7C0%7C0%7C638848173081099877%7CUnknown%7CTWFpbGZsb3d8eyJFbXB0eU1hcGkiOnRydWUsIlYiOiIwLjAuMDAwMCIsIlAiOiJXaW4zMiIsIkFOIjoiTWFpbCIsIldUIjoyfQ%3D%3D%7C0%7C%7C%7C&sdata=mW8t0HxszZ0bZ4SapKG2ooaVrcY8C%2Fx1s2H524PMZw8%3D&reserved=0
How to deal with milk income in Cashminder
As in any system, dealing with your milk income is the most complicated transaction in Cashminder, due to the nature of the transaction. There are a couple of options as to how to do it, so we explain below the impact of which option you choose, then you should open the help manual for whichever option suits your farm, to get step by step guidance as to how to enter your milk details in Cashminder
There are 2 options as to how to enter Milk data
1. Through Bank - see below
This is the simplest way to deal with milk however ALL reports will report milk Income LODGED in the year, rather than milk supplied in the year.
This is due to the fact that the amount lodged each month, is in respect of milk earned in the previous month.
This method will be suitable if you DO NOT supply milk in December, as in this case the first lodgement in your bank is in February and it relates to January milk earned – so all within the same calendar year.
2. Through Trading - see below
This is the most accurate method. Milk income EARNED in the months January to December is included in the Profit Monitor Report and Transactions (Accountants) Report. Milk income RECEIVED/LODGED is included in the Cashflow and Budgets Reports.
If you milk all year around, and the payments you make to your co-op for purchases, is by Cheque or Direct Debit, then refer to document two for instructions.
3. Through Trading and payments made to co-op for purchases is deducted directly from milk lodgement
If you milk all year around, and the Co-op withholds payment from the milk cheque in respect of your purchases to the Co-op, then refer to document three for instructions
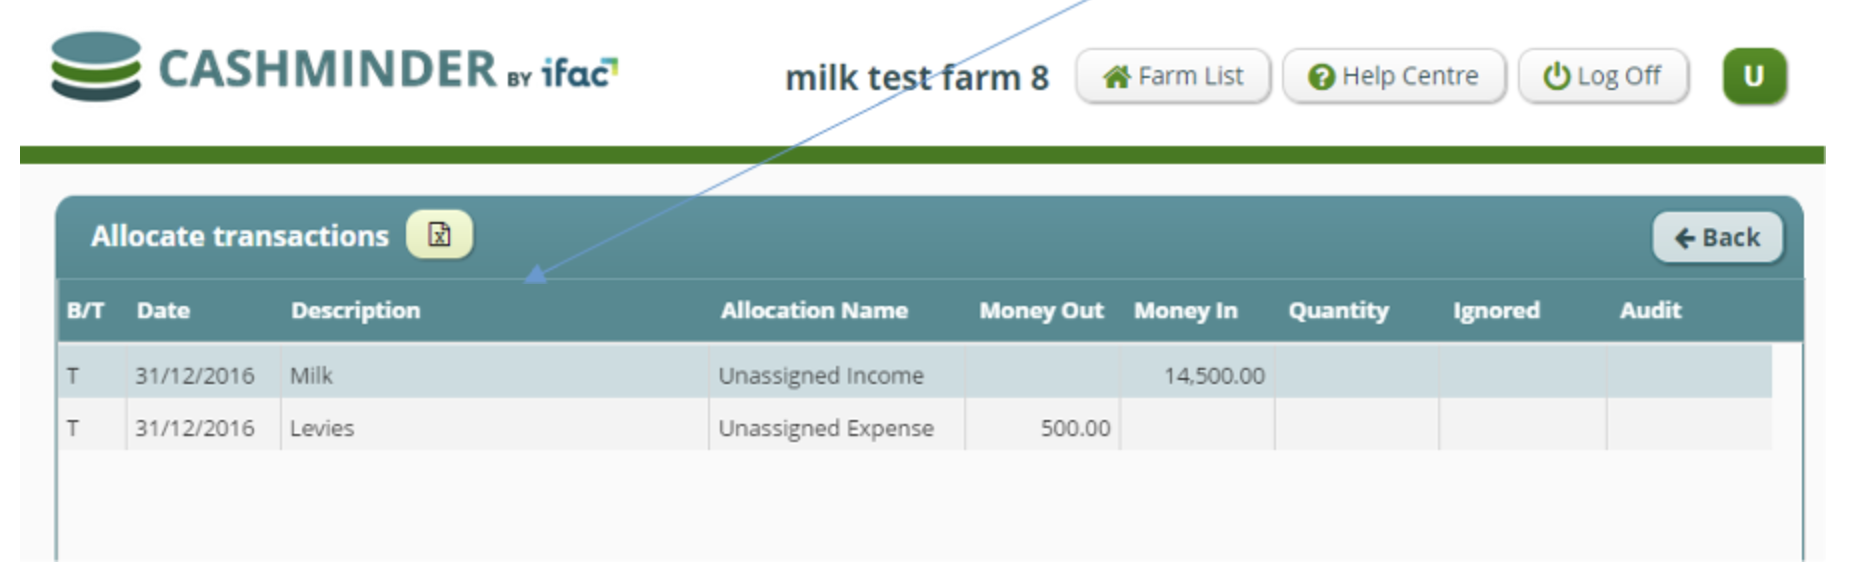
How to process milk data – through bank (Option 1)
The details on the Milk statement for Dec 2016:
Gross Milk: €14,500
Levies: €500
The Net Lodgement €14,000 as below.

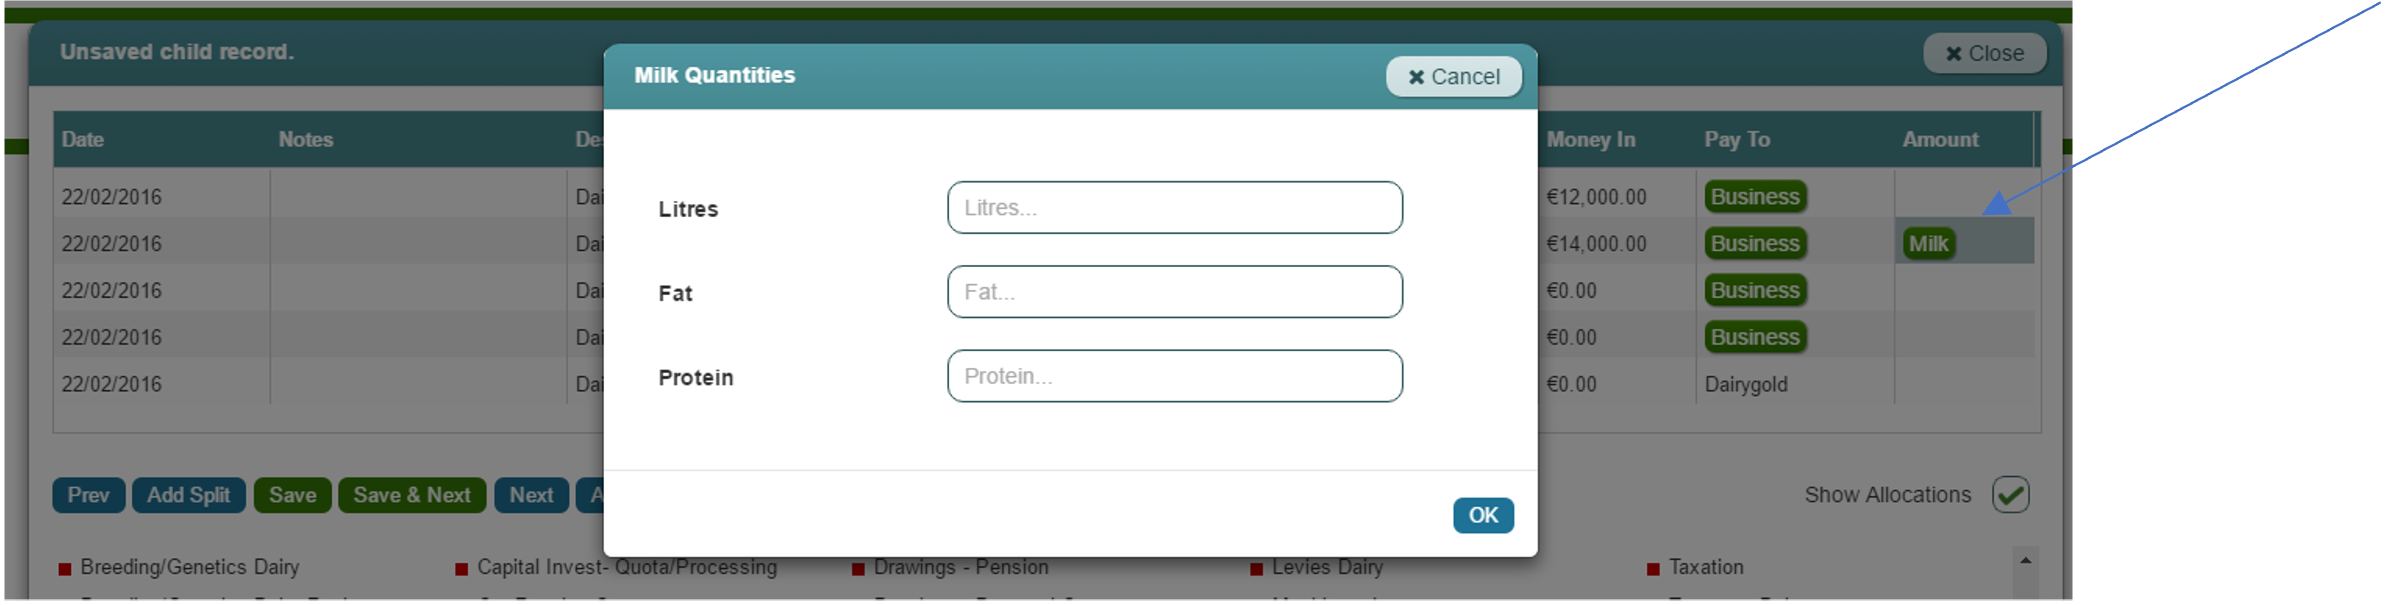
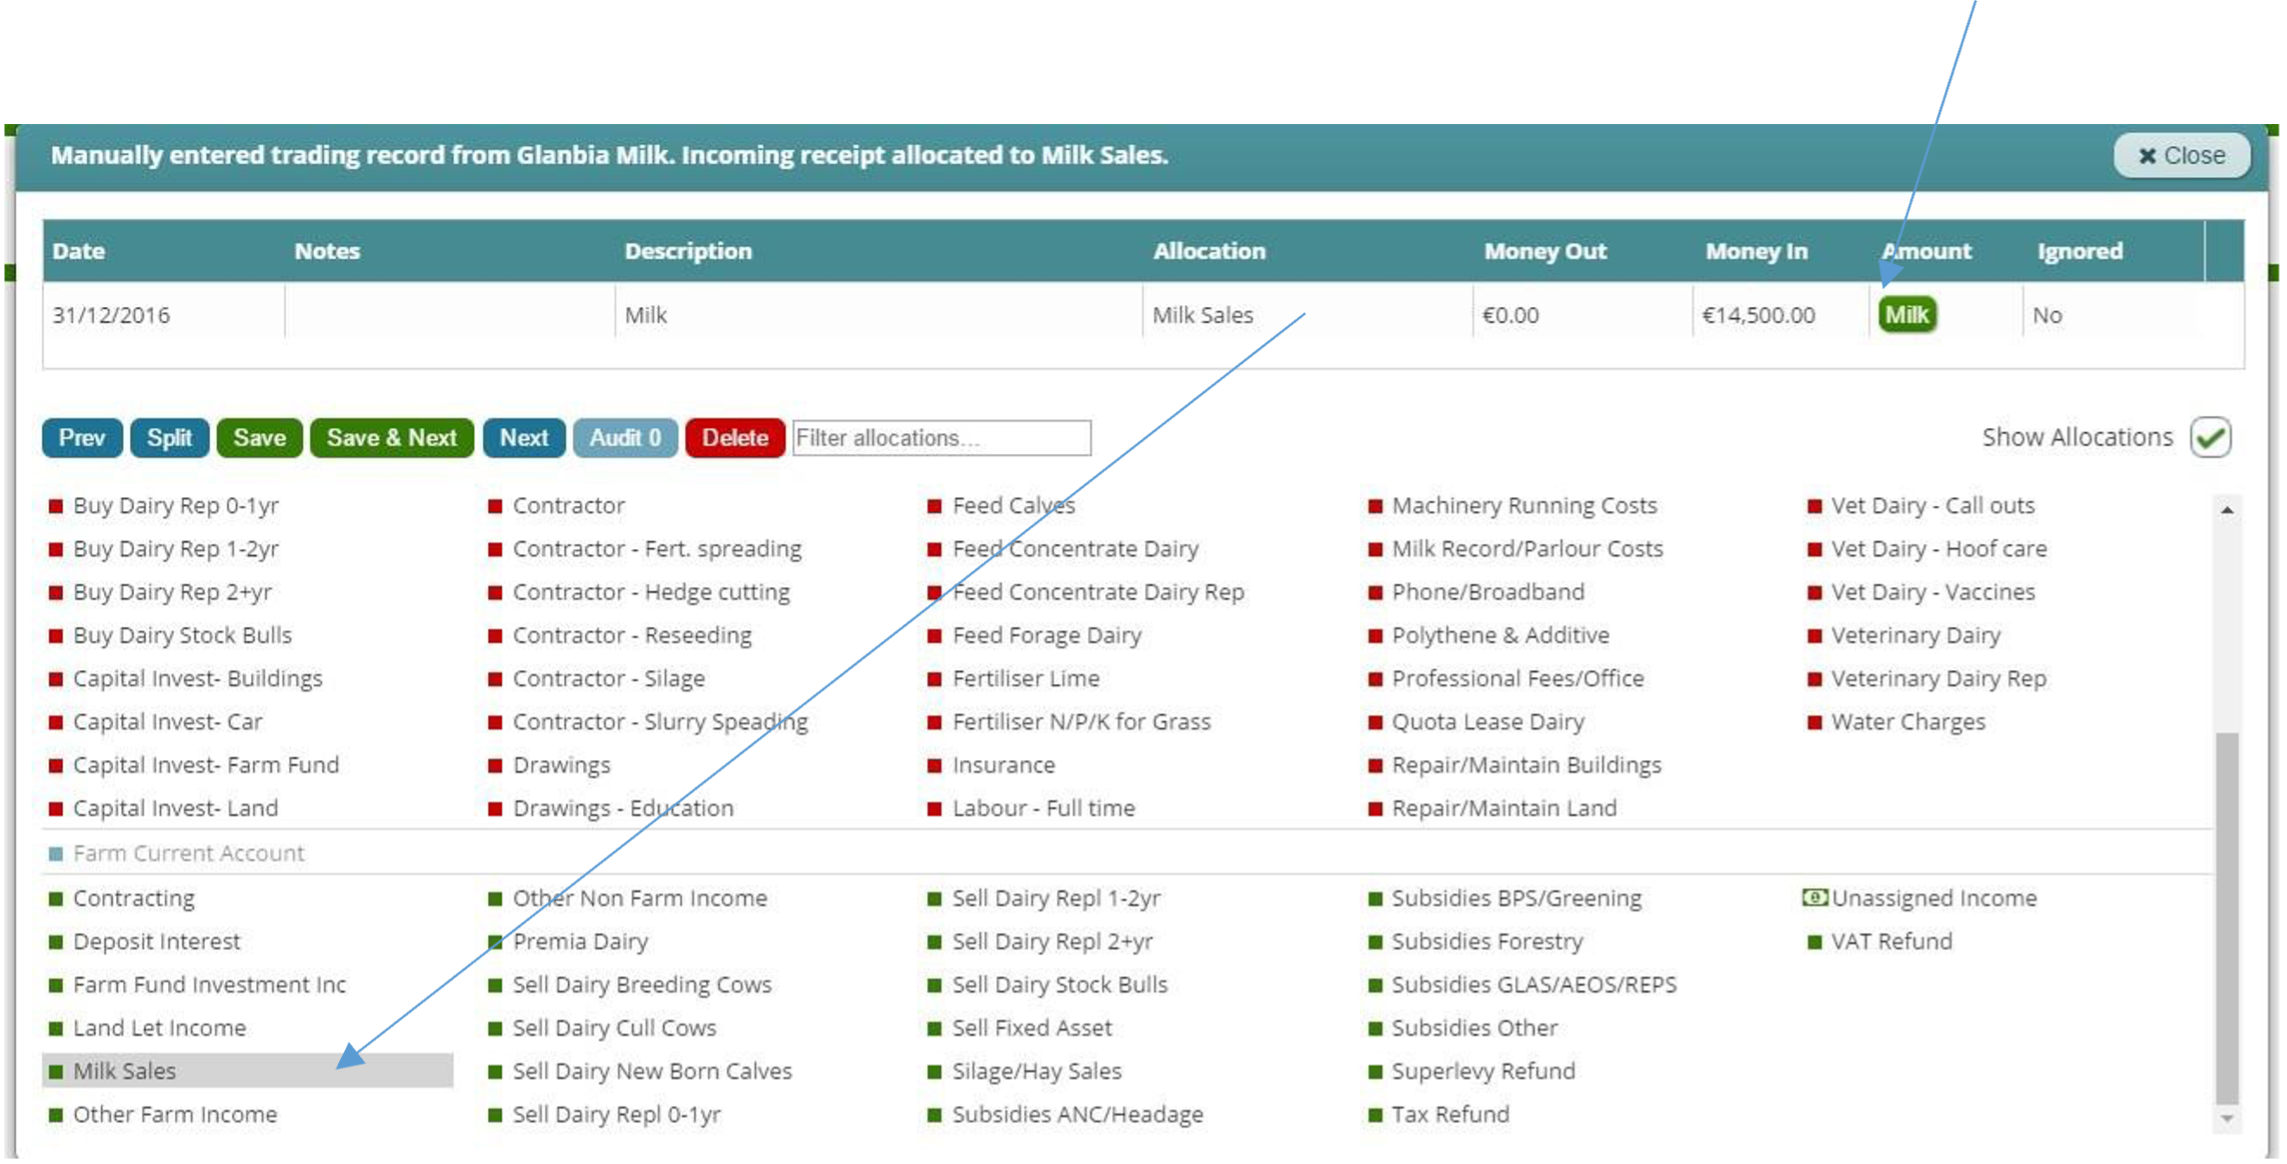
So to split straight from bank, enter the transaction, by clicking on Glanbia line in bank batch above.
Click on the blue tab “Split” and put in details as per below, allocating €14,500 under “Money In” to “Milk”, and €500 under “Money Out” to “Levies”. (If you had any more deductions from milk cheque, to keep adding an extra line/split, just click on Add Split).
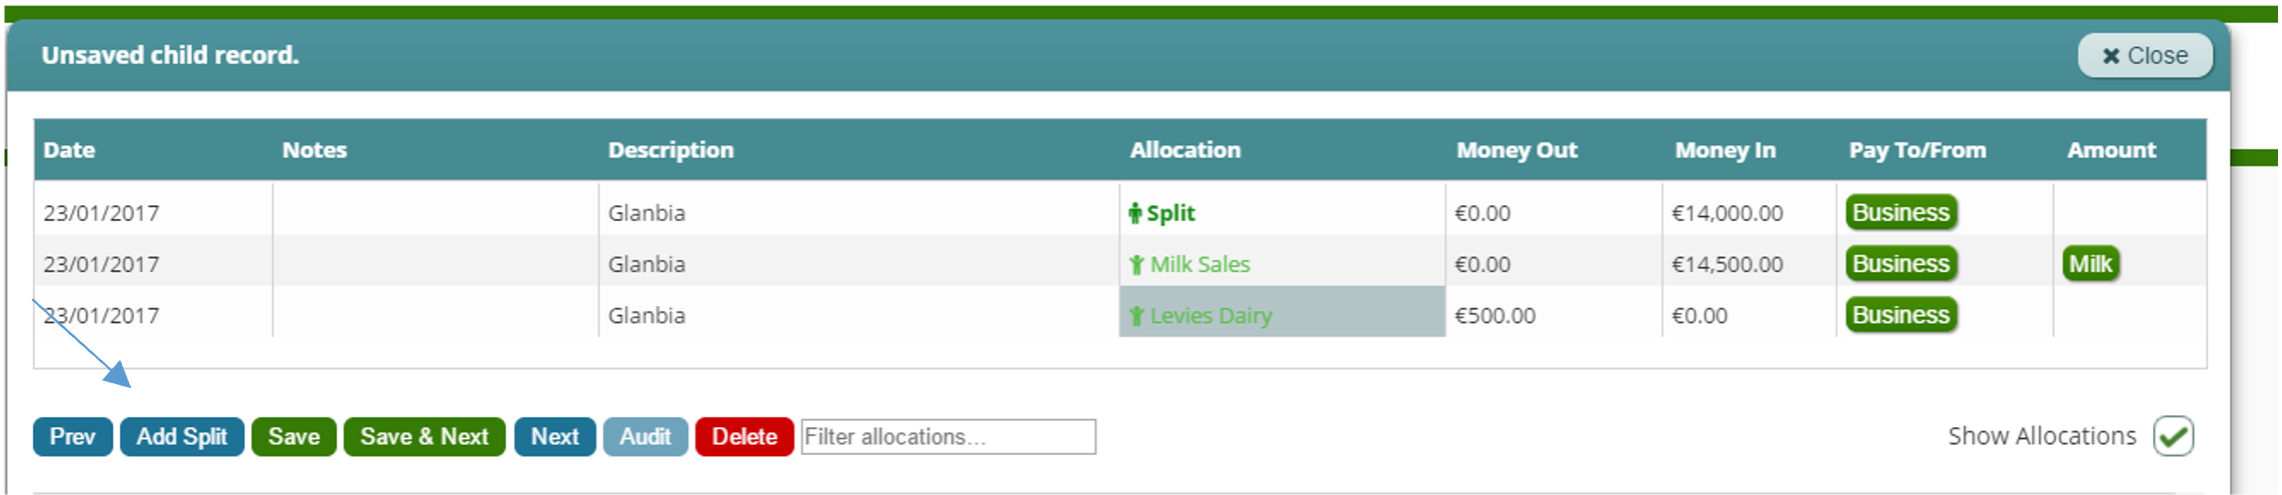
When all figures inputted, click on Save.
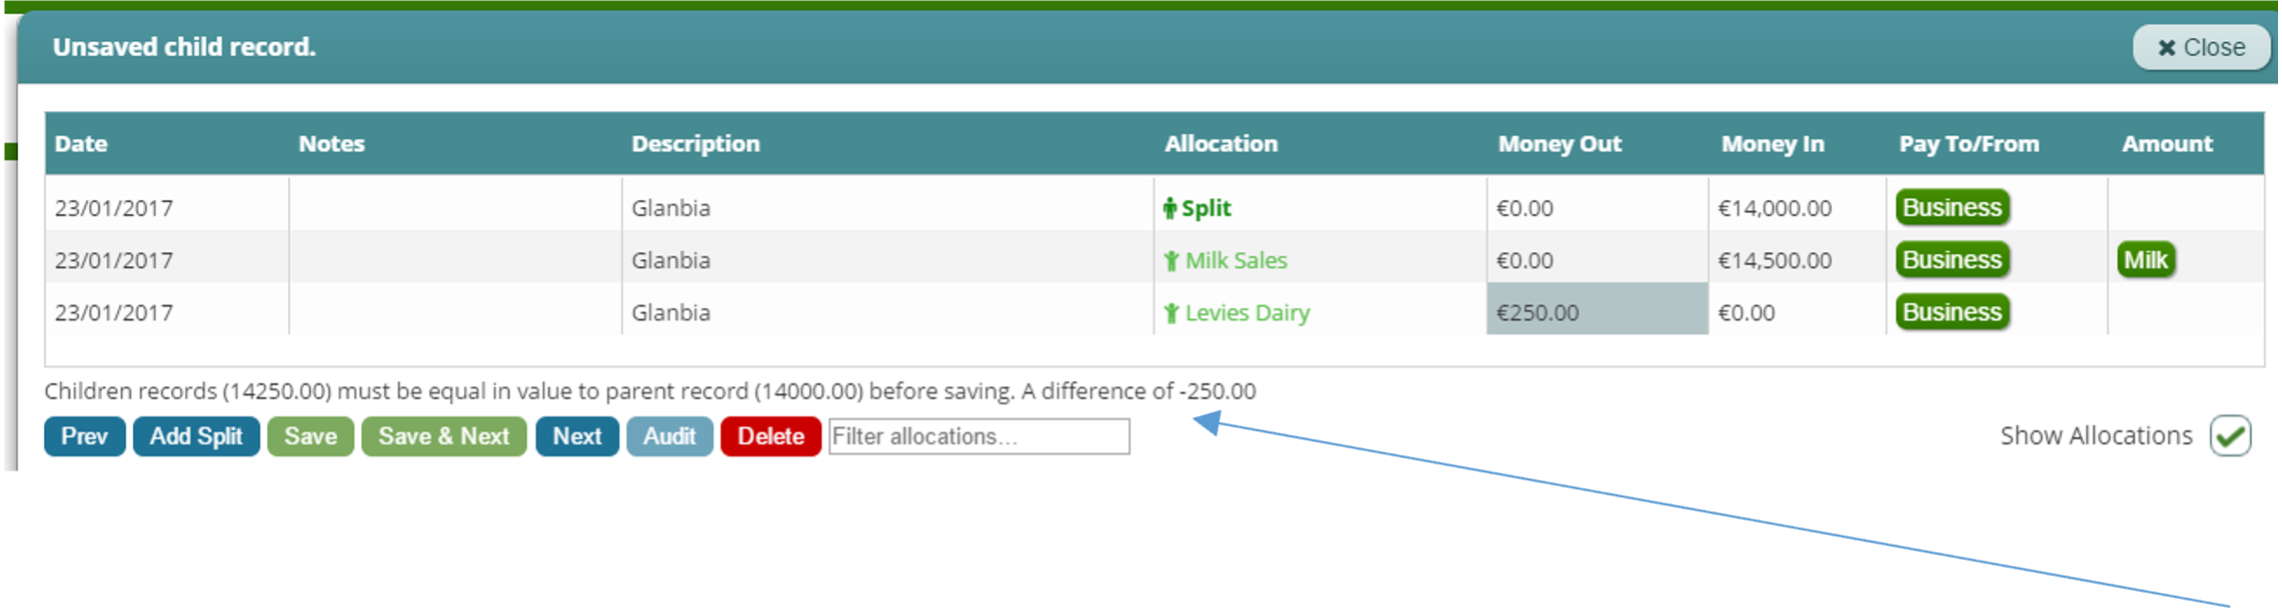
If the data was not entered correctly, for example the figures entered did not reconcile back to the amount lodged, or some of the items were not allocated, you will be prompted as to what the problem is as demonstrated below:
Also, note that by clicking on the green button for milk (which only pops up once the farmer has selected “milk sales” as an allocation option, the farmer can enter litres, fat and protein.
How to process milk data – through trading (Option 2)
Using example below:
The details on the Glanbia Milk statement for Dec 2016:
Gross Milk: €14,500
Levies: €500
Net Lodgement €14,000
Follow these steps
1) Firstly, ensure that you set up a SEPARATE MILK Account, as distinct from your purchases account if you supply and also purchase goods from the same Co-op. Refer to manual “How to set up a new business in Cashminder”
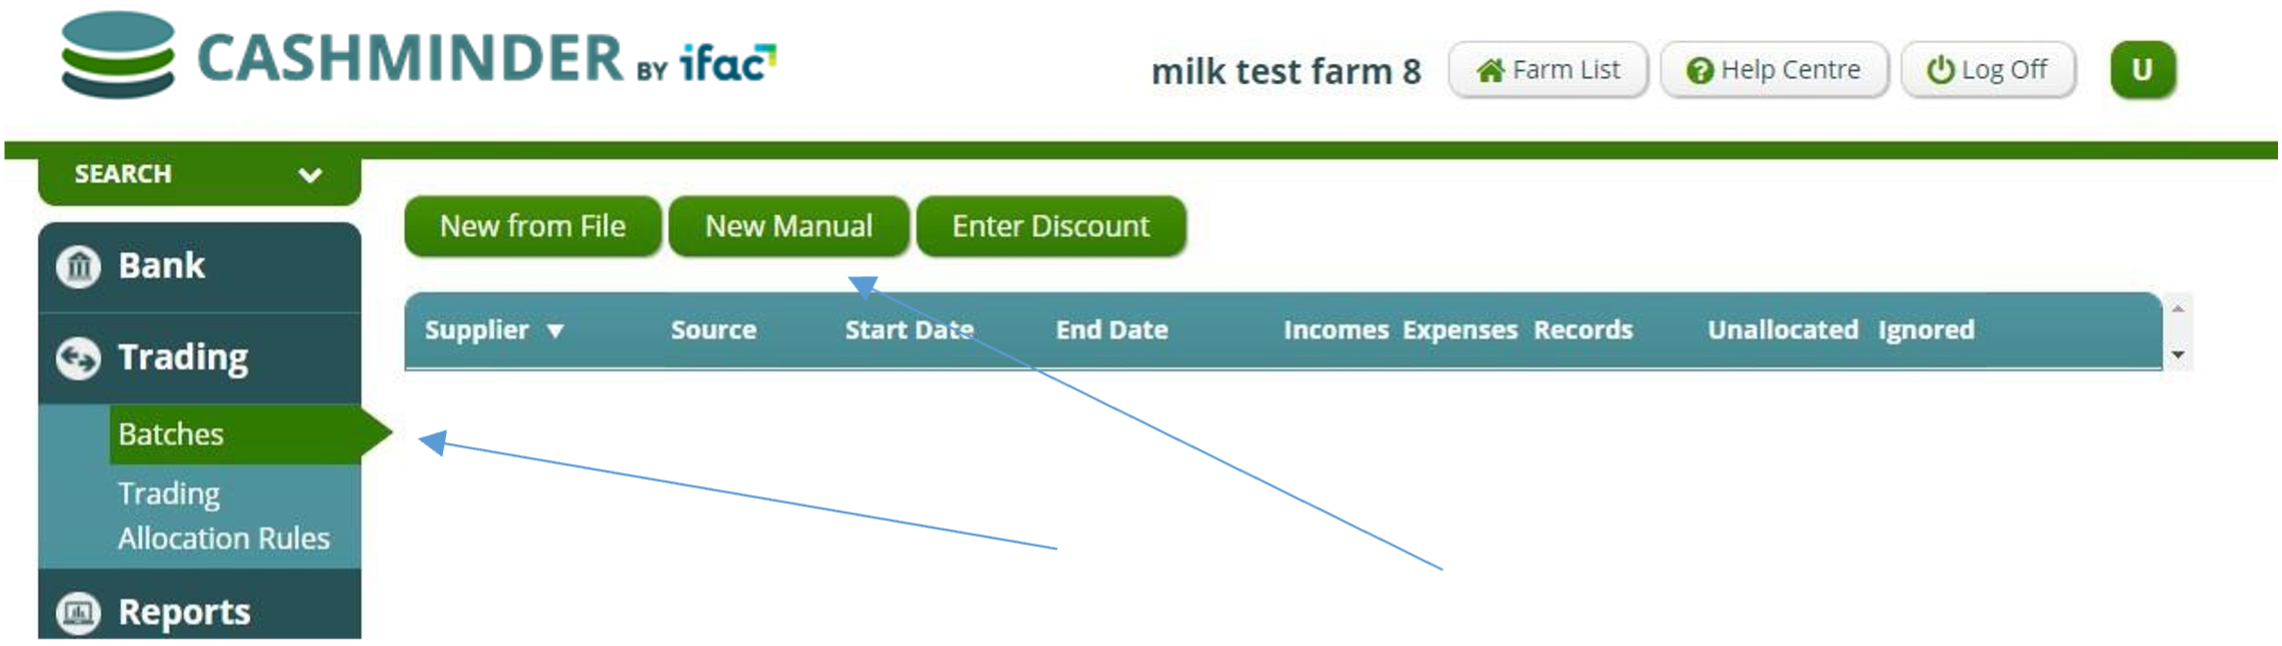
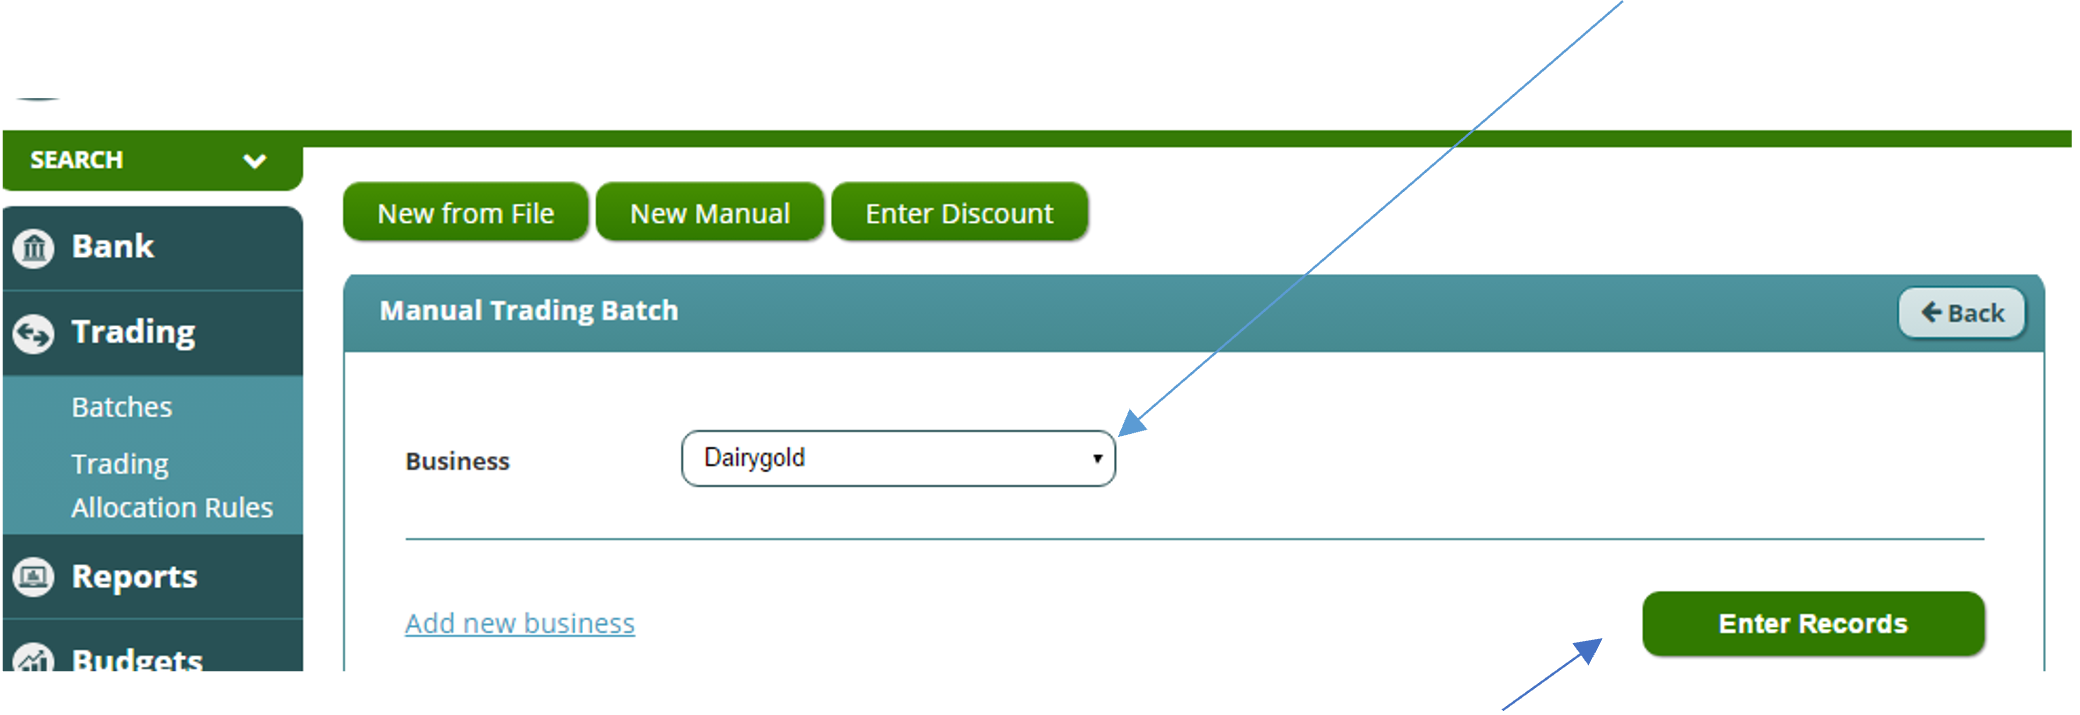
2) Enter a new manual trading batch with Glanbia MILK by selecting Trading Batches, and New Manual Batch button indicated below
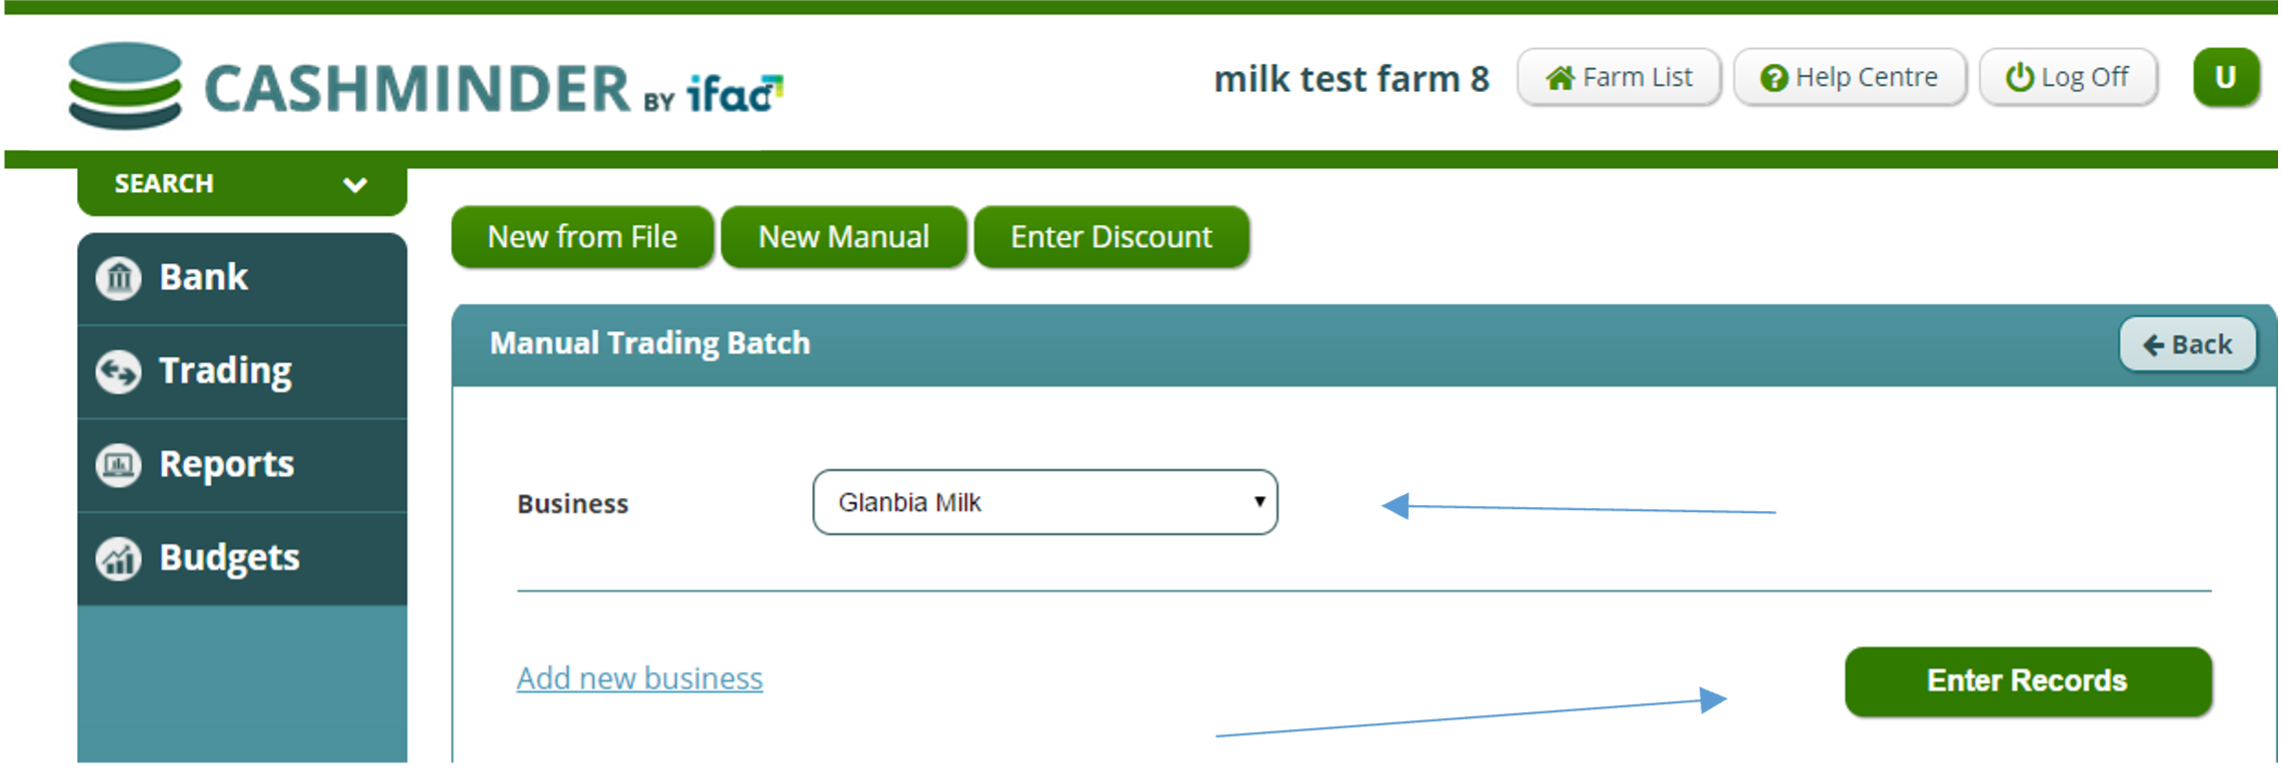
3) Select Glanbia Milk from the drop down menu and click “Enter Records”
4) Enter the data as per the milk statement. Ensure you enter the December milk using a DECEMBER DATE – I used 31/12/2016 in my example below. Note that the batch balance when complete should agree to the amount that will get lodged to the bank in the following month- 14,000 in example below
5) Once all details are entered, click on “Allocate Batch”
6) Click on the first item in the batch to bring up the allocation screen
7 ) Allocate Gross milk earned to Milk sales. Once “milk sales” selected, Green milk box below pops up
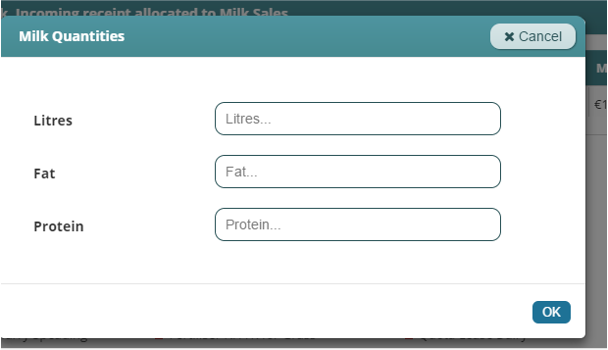
8) Click on the Green milk box, to enter Litres Fat and Protein for month in question below
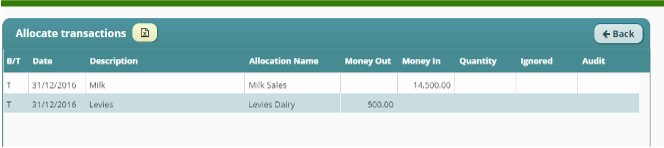
9) Screen shot of batch once allocations complete below

10) Enter the bank batch, that includes the lodgement received in January
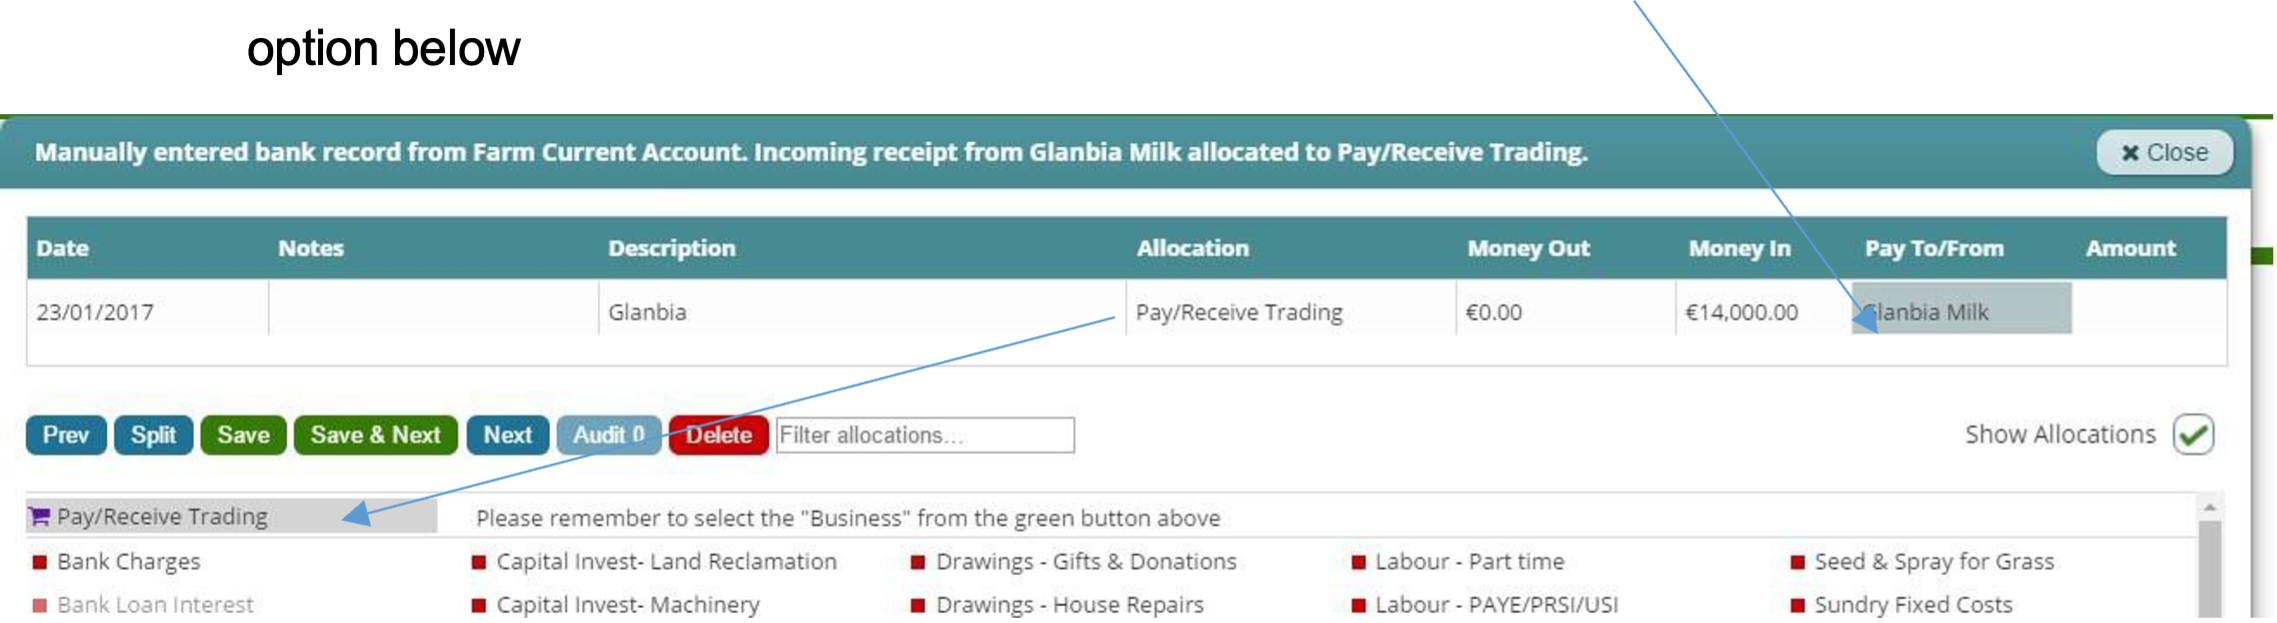
11) Allocate the lodgement to “Pay/Receive Trading” and select “Glanbia Milk” under Business Tab
12) If you run the trading report, the amount receivable from Glanbia milk, should come back to Zero
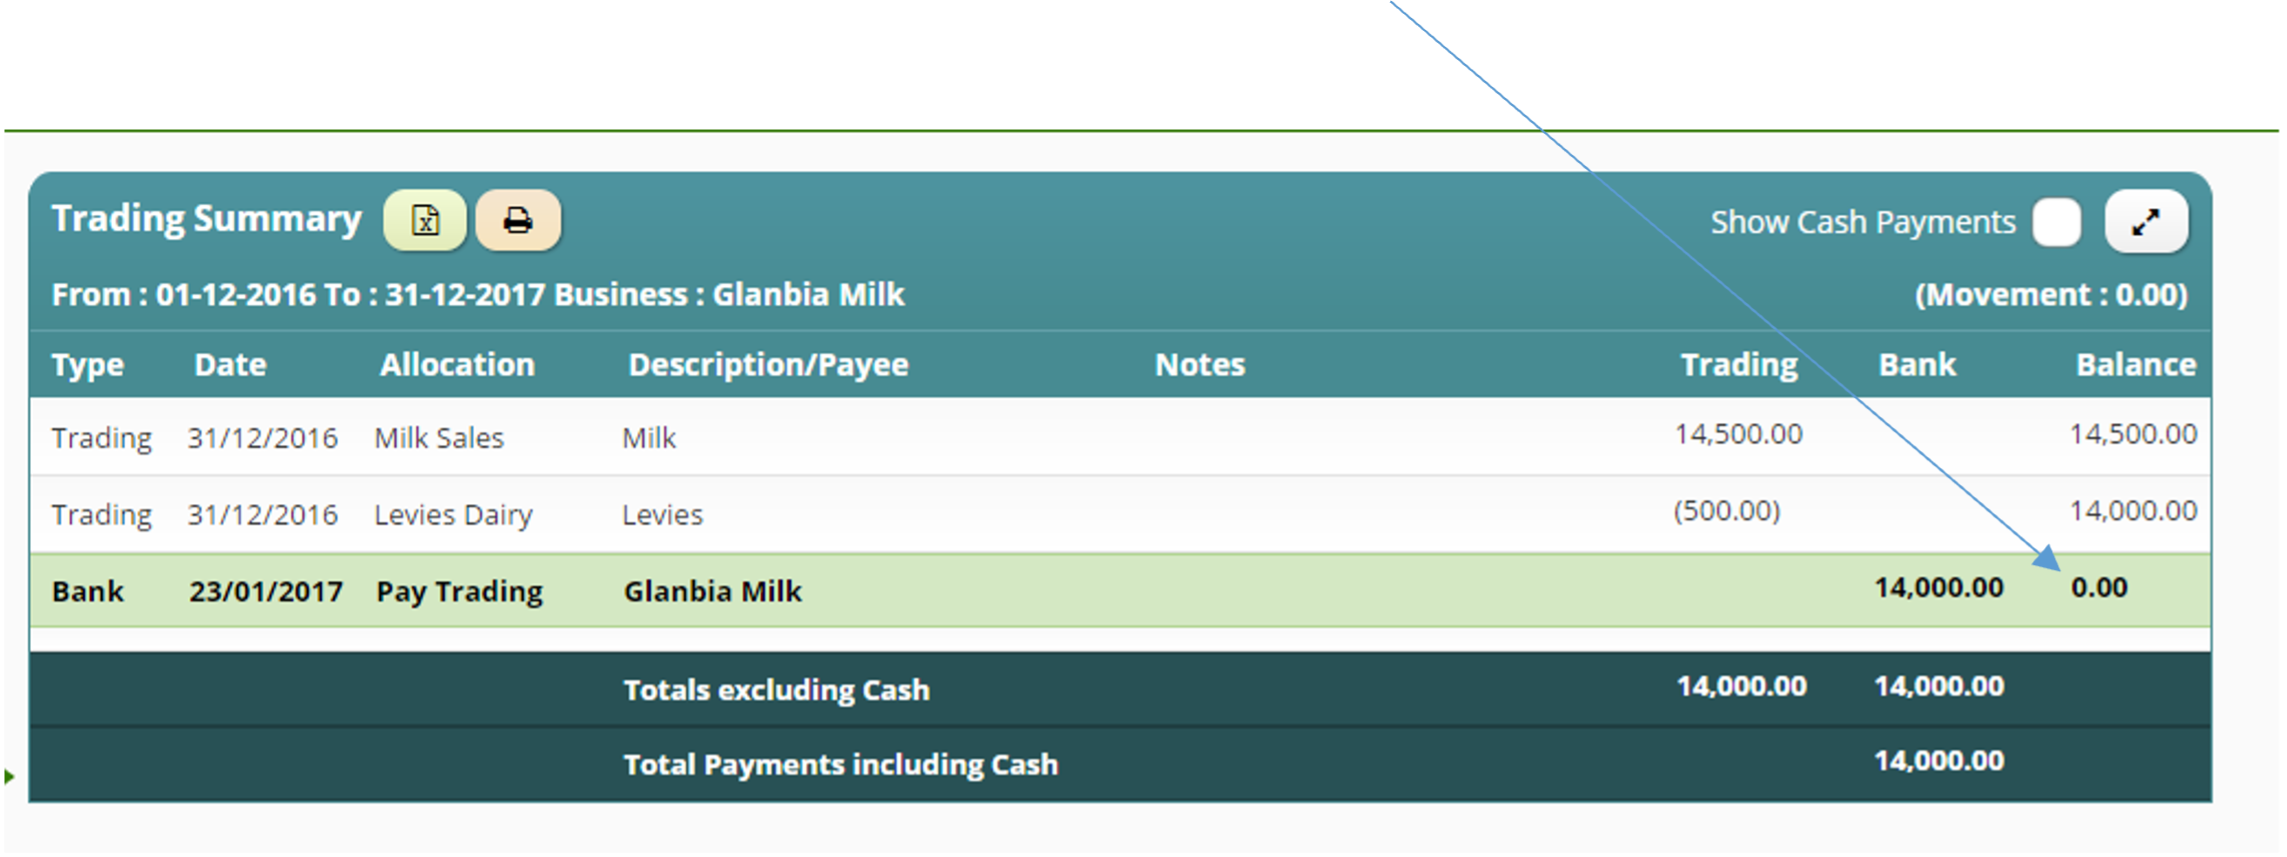
– as farmer has been paid for their milk supplied to date
Getting started on Cashminder
This document will set out the key steps to get started in Cashminder. We recommend that you print this document, and the document “How to download a bank file” for your reference.
To Sign up on Cashminder, go to website www.cashminder.ie and select “Sign-up” You will need to enter an email address and password.
You will then receive an email from ifac Support, and will be requested to click on the link to verify your email address.
Once this is done, going forward, you should select “Login” and enter your email & password details, to securely log in.
Starting a new farm
When you log in for the first time, you need to create a new farm. Cashminder allows for each farmer to manage more than one farm. For example, you might be tracking your home farm and be in partnership on a second farm.
To create a new farm…
Log in to www.cashminder.ie
Select Add New Farm at the top right
Enter the farm name and click the Save button
You will now see your newly created Farm listed in “owned farms” list. It will have a Status of “Trial”.
Each new farm will have 30 days access to Cashminder, free of charge and with no obligations to purchase at the end of the trial. To continue using the software after the 30 day trial period, you will need to click on Purchase button, and either pay securely by bank credit or debit card, or contact Ifac farm support staff member for other payment options. Each license costs €240 + VAT per annum.
Setting up the software to suit your farm
You are now ready to start entering data for your farm, so click on “Enter your Farm” from the Owned Farm list screen. There are 4 tabs on the left of the screen – Bank, Trading , Reports and Budgets. The 5 buttons under the Bank tab are: Batches, Bank Accounts, Businesses, Incomes/Expenses and Bank Allocation Rules.
Batches displays a list of all bank batches loaded so far on the software
Bank Accounts is used to create your farm bank accounts. Each farm has a Current Account setup initially. If you have any other farm accounts, such as loan or credit card accounts or more current accounts, add them to the list of bank accounts here. To set up a new bank account follow steps below
Click on Bank Accounts
Click New at the top
Enter a bank account name like “AIB Shed Loan”. You have to tick one of the boxes to indicate whether the new account is a loan (as in this example), a current account or a deposit account.
Click Create
Businesses . Here you can create a list of all suppliers to your farm. When writing cheques for your purchases you will not need to type the supplier name each time, but rather point to their name is this pre created list. You do not need to create this list at the outset, as you can create this list as you allocate your payments. Each time you pay a new supplier, you can add that supplier to the list for future reference, and build the list as you use the system.
If you wish to enter your most commonly used suppliers at the outset, follow the steps:
Click on Businesses
Click on New
Enter the business name
Click on Create button
In Incomes/Expenses you will see a listing of all incomes and expenses available in the Cashminder system. It is not possible to add or delete an income or expense since this allows for better linking to Profit Monitor. However you can select or deselect incomes and expenses, to make the system more suitable to your farm. To customise for your farm follow these steps:
Click on Incomes/Expenses button.
If you click the Beef tick box at the top, all beef type incomes and expenses will be turned on. If you click on Beef a second time, all beef type incomes and expenses will be turned off. Same for Dairy and other tick boxes.
Then scroll down and individually tick/untick individual incomes or expenses. Use the tick box on the right hand side to turn on or off.
REMEMBER: When you have finished selecting incomes and expenses, remember to scroll up to the top, or down to the bottom, and click on Save
Note: If you deselect an income or expense, but at a later date you realise you need it, you can come back to this section and activate it again in this screen.
Bank Allocation Rules is where you can see transaction descriptions in bank files are linked to incomes, expenses and bank transfers. To create a new rule linking “Joe Blogs” to “Labour Wages” expense...
Click on Bank Allocation Rules
Click New at the top
There is some very useful help text on the right side of this screen.
Select the bank account where payments are made to Joe Blogs
Enter the Bank text as “joe blogs”
Select “Labour Wages” from the Expenses drop down menu.
Click Save at the bottom
Going forward every time “joe blogs” is recorded on a bank transaction it gets allocated correctly to “Labour Wages”
Every time you allocate a payment from your bank account, a rule will be automatically created for this transaction in “bank allocation rules” so it is not necessary to create all rules at the outset, but you can generate them as you allocate payments in the system. You may need to edit these rules to delete test in the transaction description which would prevent Cashminder from recognising that a future transaction is for the same expense heading. For example, if you use your debit card to pay for Petrol, the transaction description may say “POS 10/6/24 Murphys garage”. If you allocate this transaction to “car running cost”, you will see that a rule will have been added to your bank rules list for this transaction. You will need to select “edit” this rule, and delete “POS 10/6/24” from the description. By doing this you are telling the system, if there ever is a bank transactions containing “Murphys garage”, allocate it to “car running costs” irrespective of what date the card was used
Loading a bank file
Only do this after you have used the Bank Accounts button as described above.
Before you can upload a bank file into Cashminder, you need to export the data from your online banking and save the export file to your computer. There is another document available on the site that describes how to download bank files from various online banking systems. To load a bank file do as follows…
Click Batches in the Bank tab
Click on New from File
Pick the bank account to load these records for
Click on Choose File to pick your bank file. (Note: When you download your bank file, you need to note the folder where this file is located on your computer.)
Click on Upload file
Starting to allocate bank data
Only do this after you have used the Bank Accounts and Incomes/Expenses buttons as described above.
Click Batches in the Bank tab
If a bank file has been uploaded, you will see details in this screen.
Click on Allocate on the right hand side.
You will now be presented with all transactions in this bank batch/statement and the initial status of all transactions will be “unassigned”.
Click once on any record to allocate.
The listing of expenses (red) and incomes (green) will reflect the incomes and expenses selected in Income and Expenditure described above. Bank accounts listed in blue will have been entered in Bank Accounts described above.
Click on an income, expense or bank and then click Save & Next. The system will move down to the next transaction in the batch.
If you are paying a bill to a co-op or store, and if you are recording trading data in the Trading section of the software, pick the red Pay Trading option in this screen and also pick the trading company under Pay to on the top right.
Loading bank data manually
Not all banks can download all account types. For example, a bank may be able to download current accounts but not be able to download credit card or loan accounts. It depends from bank to bank. We have a manual system to load in bank statements in this case. We do this in a 2 stage process – stage 1 is to just type in the raw data from the bank statement and stage 2 is to allocate the transactions. We split this in to 2 stages because each stage may be done by a different person. To add a bank statement manually, do as follows.
Click Batches in the Bank tab
Click on New Manual
Pick the bank account that this data is for
Enter the date from the 1st record on the bank statement
Enter the opening bank statement balance which is important to keep all balances correct from statement to statement.
Click on Enter records
In the next screen, the main data required is “Date”, “Description” as well as “Money In” and “Money out”.
When finished data entry, click on Batches button on top left to view the list of batches entered.
Now click on Allocate on the right hand side of the batch that you just entered. You can now allocate the records in the same way as if the data had been imported electronically from the bank.
Trading area
The Trading area is used to track trading data with a large store, where you get a lot of products on credit and pay months later. For example, you buy a lot of feed and fertilizer and other products in January, February, March, April, etc. and then start making payments in July and August. The advantages of using this trading area are.
You can download trading data from a number of co-ops such as Dairygold, Glanbia, Arrabawn, Centenary, Drinagh and Kerry Group. This will provide a lot of management data quickly.
When you write the cheque to pay for some of the outstanding items later in the summer, when you are allocating your bank records, you just select the expense called Pay Trading and also select the name of the company - you don’t need to allocate costs at this time.
You can use the Trading Summary report to check balances at year end
Loading Trading data, either manually or from a file, is the same as loading bank data, so see the steps further up in this document.
Ignore records in Trading files
When you load in files from some co-ops sometimes there may be more records in these files than are actually needed. For example, you may see “OPENING BALANCE” and “CLOSING BALANCE” records. There may also be records where the co-op documents movements of money between the co-op trading and milk accounts. We just need expense records in Cashminder so we have a system to Ignore records that are not needed. We prefer to ignore them rather than delete them completely.
The initial opening balance for a Trading account
Cashminder should have a record of the opening balance with each trading business on the first day of the first year. For example, let’s assume that you are starting to use Cashminder from January 1st 2025 and that a trading balance existing from 2024 for
€400 for one of your trading businesses. To deal with this, use New manual in the Trading area, pick the business concerned and then click on Enter Records. Enter a value for “Money Out” of €400 for this business on 31/12/24 and then allocated to a suitable expense using Allocate.
Entering a discount in Trading area
A discount is the same as the return of goods and is entered in the same way as manual trading records. It reduces the balance with a trading business. Use the Enter Discount button in the Trading area, pick the business concerned and then click on Enter Records. Then enter the discount amount in the “Money In” column (not “Money out”), enter the date the discount was given. Then use the Allocate button as normal to allocate a suitable expense to be discounted.
Bank Reconciliation
Not all cheques written in a calendar year will clear the bank in that year. Some cheques will clear through the bank in the early days of the next year, but the farmer and their accountant would like to record the cheque in the year that it was written.
Let’s use 2024 as an example year. If your accountant wants data for 2024 and data has been imported for the initial months in 2025, then cheques written in 2024, and that subsequently cleared in 2025, will be in Cashminder in a 2025 bank batch. Cashminder has a system to identify these cheques and report them in the 2024 year in the Transaction Report and Profit Monitor report
Select the Bank Reconciliation option in the Reports area.
Click on New at the top.
Beside Bank account select the bank account that you want to reconcile
Set the Period End Date to 31/12/24.
Look at your cheque stubs to see the first cheque you wrote in 2024 and enter the number of this cheque beside First cheque
Look at your cheque stubs to see the last cheque you wrote in 2024 and enter the number of this cheque beside Last cheque.
Click on the Create button.
Cashminder will list cheques that didn’t clear the bank until after the Period End Date. To the right of each cheque you are given the option to click on set report date to 31/12/24. Use this option if the cheque cleared in 2025 but needs to be reported in 2024.
If 2023 is your first year on Cashminder, repeat the above process for the period ending 31/12/2022. You may have written cheques at the end of 2023 that may not have cleared until early 2024. You need to set report date to 31/12/23 to exclude these from the Transaction Report and Profit Monitor reports for 2024.
Access and Security
Because of the confidential nature of this financial data it is important that we keep a clear focus on data access and data security. When you login to www.cashminder.ie you arrive at a screen that displays farms linked to this login. On the right-hand side is an option that is only available to owners of farms, called Permissions.
In Permissions you will see Invite new user. You can send an invite to someone new, such as your accountant or farm adviser, using New Invite. You can break a link to an existing invitee using the Break Link option. You must know the other persons Cashminder username in order to invite them to see your farm data.
All data access and data changes are audited. So if you invite another person to see your data, every time this other person logs in, you will be able to see that they logged in. This is displayed on the right-hand side of the Permissions screen. If this other person makes changes to your data, these changes are also logged and displayed in this audit trail.
Checklist for accounts in Cashminder
Check list to make sure your farm data for the year is complete
This document describes how to check that all data has been recorded correctly and is in good shape to be used by accountants and farm advisers. This check list can be used by farmers and by accountants.
All farmers can give their accountant an invite to see their farm data in Cashminder. There is a separate document (How to invite my accountant) describing how this is done. The purpose of this document is to show farmers, and especially accountants, what to look for in terms of data quality and accuracy.
The key reports for an accountant in Cashminder are Transaction Report, Trading Summary, Bank Transfers and Bank Reconciliation.
Look for unallocated items and check bank balances
Most bank statement data will be downloaded from online banking systems and the closing balances will be exactly as per the bank statement. All incomes and expenses and bank transfers are initially set to “unassigned” unless Cashminder auto allocates them.
The farmer, or accountant, then allocates all transactions to an Income, an Expense or to a Bank transfer. Before an accountant consumes year-end data, the first job is to check that there are no records left as unassigned.
Click on Bank Batches
Check that all values in the Unallocated column are zero. A quick way to see all unallocated items, is to click on the U icon at the top left-hand side of the page and click. This will show up a full list of the unallocated items. Then allocate items to appropriate income/expenses.
Think of bank batches as being the same as bank statements. If the closing balance of one bank batch is not the same as the opening balance of the next batch, this record will be coloured in light red.
Check that the bank balance on the last day of the year matches the actual bank account statement closing balance.
Click on Trading Batches.
Check that all values in the Unallocated column are zero.
Check that loan accounts have been entered correctly
Cashminder is designed primarily to import bank data from online banks. It expects one file for a current account and one file for each of the loan accounts. In reality most online banks cannot export loan account data, so unfortunately these loan statements need to be entered manually.
To use an example… when working with the current account, a farmer allocates 4 records during the year to a “Shed Loan” account. To handle this “Shed Loan” correctly, the farmer or accountant, also needs to create a new manual bank batch for the “Shed loan” and check that there are 4 lodgments coming into the loan account, for the same amount, and also check that any loan interest charges have been recorded as well. Cashminder will offer to auto create the 4 repayments when this new manual loan batch is being created. The Bank Transfers report is designed to show if all these records have been recorded correctly.
Select the Bank Transfers report.
Set the From Date and To Date and then click on Bank Transfers button.
Check that the total at the bottom of the Transfer In matches with the total at the bottom of the Transfer Out column.
If these two values do not match, click on the value of the mismatched item to see what account it has been allocated to (under Allocation Name). Then create new manual batches for the effected loan accounts in the Bank Batches area.
Check trading balances with big suppliers
Cashminder is basically a cash system and is designed to import data from online banks. However, the system can also import trading data from online dairy co-ops, and farmers can enter trading data manually also. Thereby when a large cheque clears the bank in the autumn, Cashminder can automatically allocate this cheque amount using trading records. Farmers usually only track a small number of suppliers in this way. To check the completeness and accuracy of trading data for a supplier…
Go to Reports section
Select Trading Summary report.
Set the From date and To Date and then pick a supplier company to right of
Trading Summary for and click on Trading Summary button.
Check that this trading report in Cashminder matches the creditor statement for this supplier.
The year-end balance in Cashminder should match the year-end balance on the creditor’s statement.
Common possible mistakes are missing credit notes and missing co-op bonuses.
Look at cash flow for monthly variance
Select Cash Flow report.
Set the From Date and To Date and click on the Cash Flow button.
Scan all months for all incomes and expenses and look for possible mistakes.
For example, there are life assurance payments of 50 Euro for 11 months and life assurance is 0 Euro for the 12th month. Either the policy was cancelled or something was allocated incorrectly.
View cheques that cleared the bank in the following year
Cashminder has a system to identify cheques that were written in one year and cleared the bank the following year. Refer to the Bank Reconciliation section of the How to get started on Cashminder manual for details on how to do this. To view cheques effected in this way.
Select Bank Reconciliation section in Reports
Click on View Cheques on the right hand side for different bank accounts and periods of time.
Here you can see the cheques where report dates have been changed to the last date of the previous year.
For accountants use: After you have posted journals from the Transaction Report into your accounts system, the balance you have for the current account in your draft accounts, should agree to the reconciled balance from Cashminder’s Bank Reconciliation report.
Likewise, for loan accounts and deposit accounts, the balance in your draft accounts, after posting the Transaction Report journals, should all agree to the bank statements for these accounts.
Check allocations in the Transaction Report
The Transaction Report is the key report for an accountant and this is the final destination for an accountant in terms of getting usable data from Cashminder.
Select Transaction Report.
Set the From Date and To Date and click on the Transaction Report button.
If two years of data has been entered in Cashminder, scan down through all incomes and expenses and look for a big variance from one year to the next.
Place a tick on Show Details at the top.
Review all allocations, particularly drawings, sundry expenses, repairs, capital additions, etc, to check that allocations have been done correctly. Click on any record to make changes.
At the bottom of this report check that the Allocation Totals and the Movement Totals match 100%. If they don’t match, missing bank transfer records are the most likely issue.
Pay extra attention to the transactions that were auto allocated by Cashminder.
When finished checking, take the tick out of Show Details.
An accountant can export or print this report, and then either import or manually journal values into the accountant’s own software system.
Accountants - what’s not included in Cashminder?
Farmers are not accountants, and Cashminder is designed to capture only data that farmers are comfortable with, and leave the rest to the farm accountant. Untouched areas within Cashminder include…
Cheques written and not cleared by the bank at year-end may be missing. The exception is where farmers have loaded data for early months of the following year and used the Bank Reconciliation report.
Opening & Closing Stock journals.
Depreciation journals.
Prepayment & Accruals journals.
Getting help
If you need help please contact Cashminder by ifac support at cashminder@ifac.ie or phone 052 7741772 9am to 5pm Monday to Friday.
Milk data via trading and payment
Entering milk income via trading and the milk supplier deducts payments from the milk cheque in respect of purchase with the co-op
Many farmer purchase goods on credit from the same Co-op that they supply their milk to.
The farmer should keep 2 separate accounts with this Co-op, one for MILK and one for purchases.
The monthly purchases should be entered in Trading batches as normal (either through file import, if trading with Glanbia, Kerry Agri business, Dairygold or Drinagh) or manually (at present) for any other co-op
Sometimes payments are deducted directly from the milk cheque to Pay off against purchases accounts
The steps as to how to deal with this in Cashminder are set out below:
Let’s demonstrate using an example:
A farmer has a lodgement in his bank account on 22/2/16 of €12,000 received from Dairygold Co-op. This is in respect of his January Milk Statement, with the following details:
Gross Milk:€14,000
Levies: (€500)
BVD: (€250)
Amount deducted from milk cheque to pay for Dairygold purchases: (€1,250)
1) Go into Trading, Batches, select New Manual and then Enter Records
Make sure you select Dairygold MILK account as the account you are entering records for. The default selection is the first business on your business list, in the example below that’s Dairygold (purchases) so you need to click on the arrow to get the dropdown menu, and select Dairygold MILK account
2) Enter the data per the milk statement, into the manual trading batch, starting with Gross milk income in the Money In column, with all deductions EXCEPT the payment to the Co-op for purchases, being entered in the money out column.
3) Before you exit this screen below, just note that €13,250 is the amount receivable for Jan 16 milk
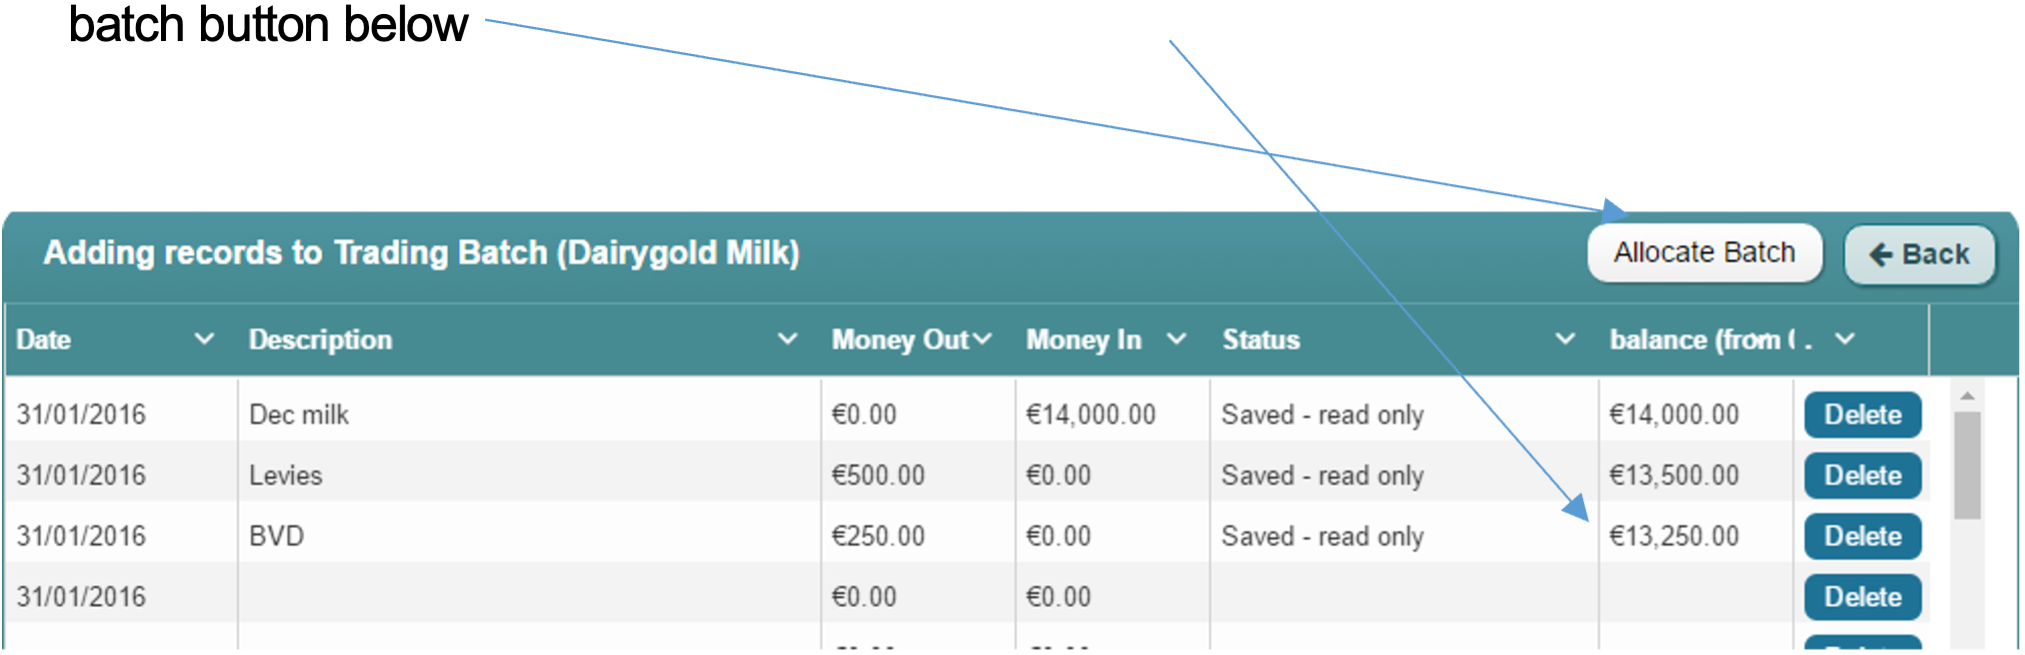
4) You will need to allocate each line to the appropriate income and expense head by selecting allocate batch button below
5) Now you need to allocate the lodgement that came into the bank in February (by going into your Bank, Batches) relating to the milk statement above.
You need to split the transaction, as the €12,000 lodgement is effectively made up of €13,250 that you received in respect of Dairygold MILK income, and €1,250 is a payment (taken direct from milk cheque) in respect of your Dairygold purchases.
So allocate 13,250 To Pay/Receive from Trading & select Dairygold Milk as supplier
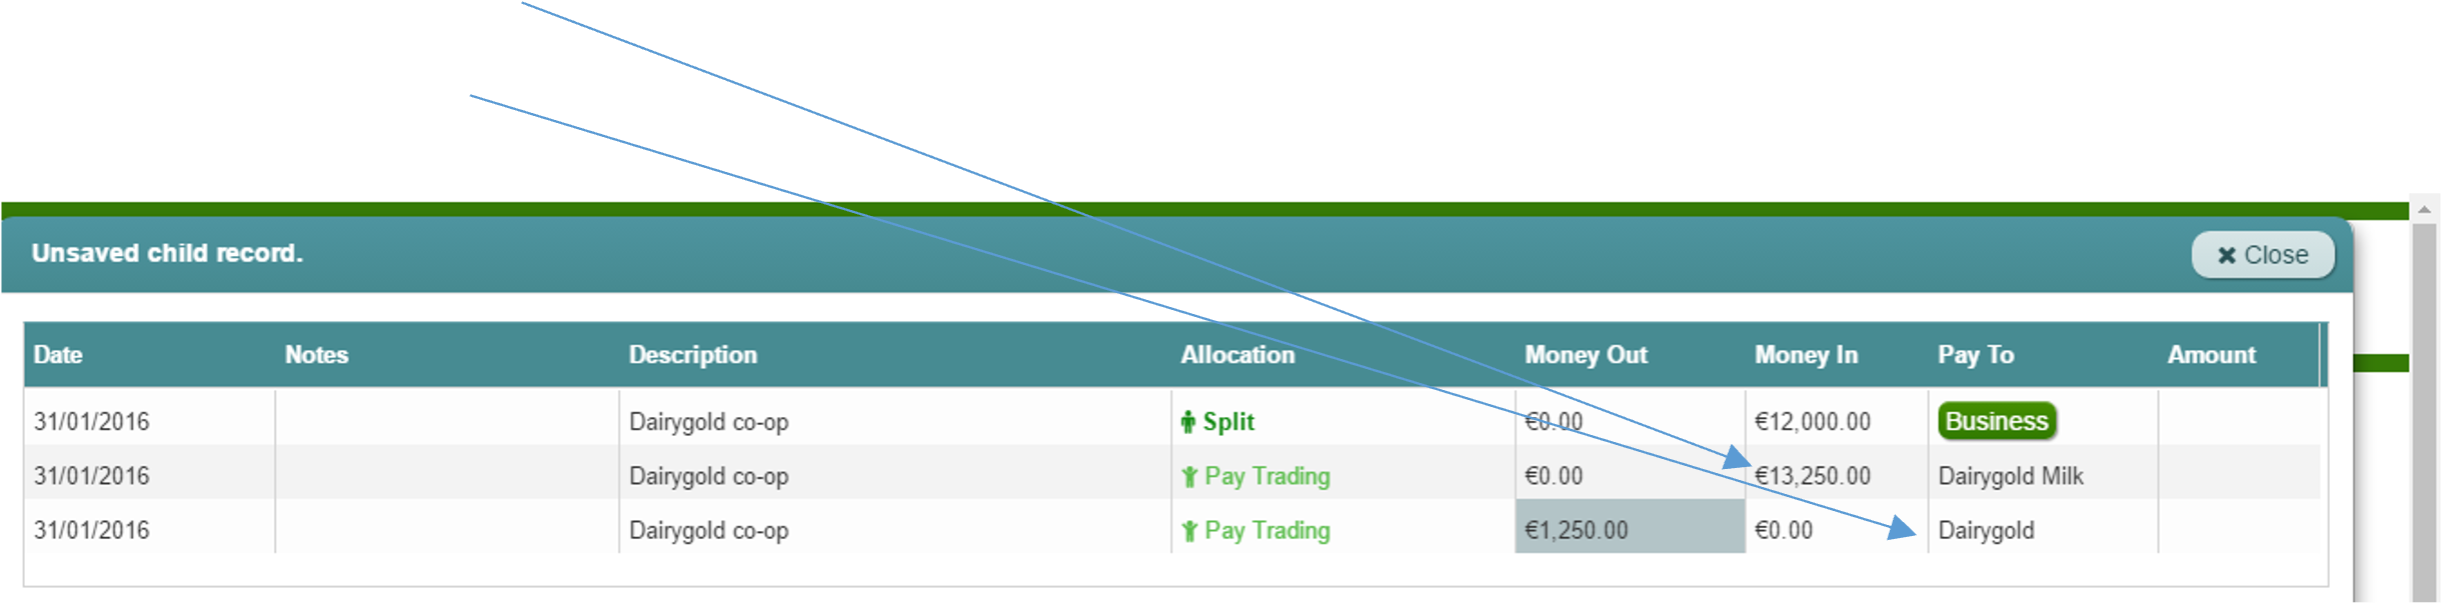
Then allocate 1,250 also to Pay/Receive from Trading & select Dairygold (purchases) account as business
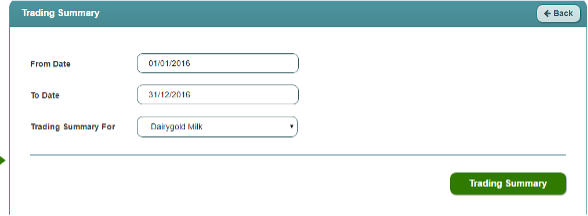
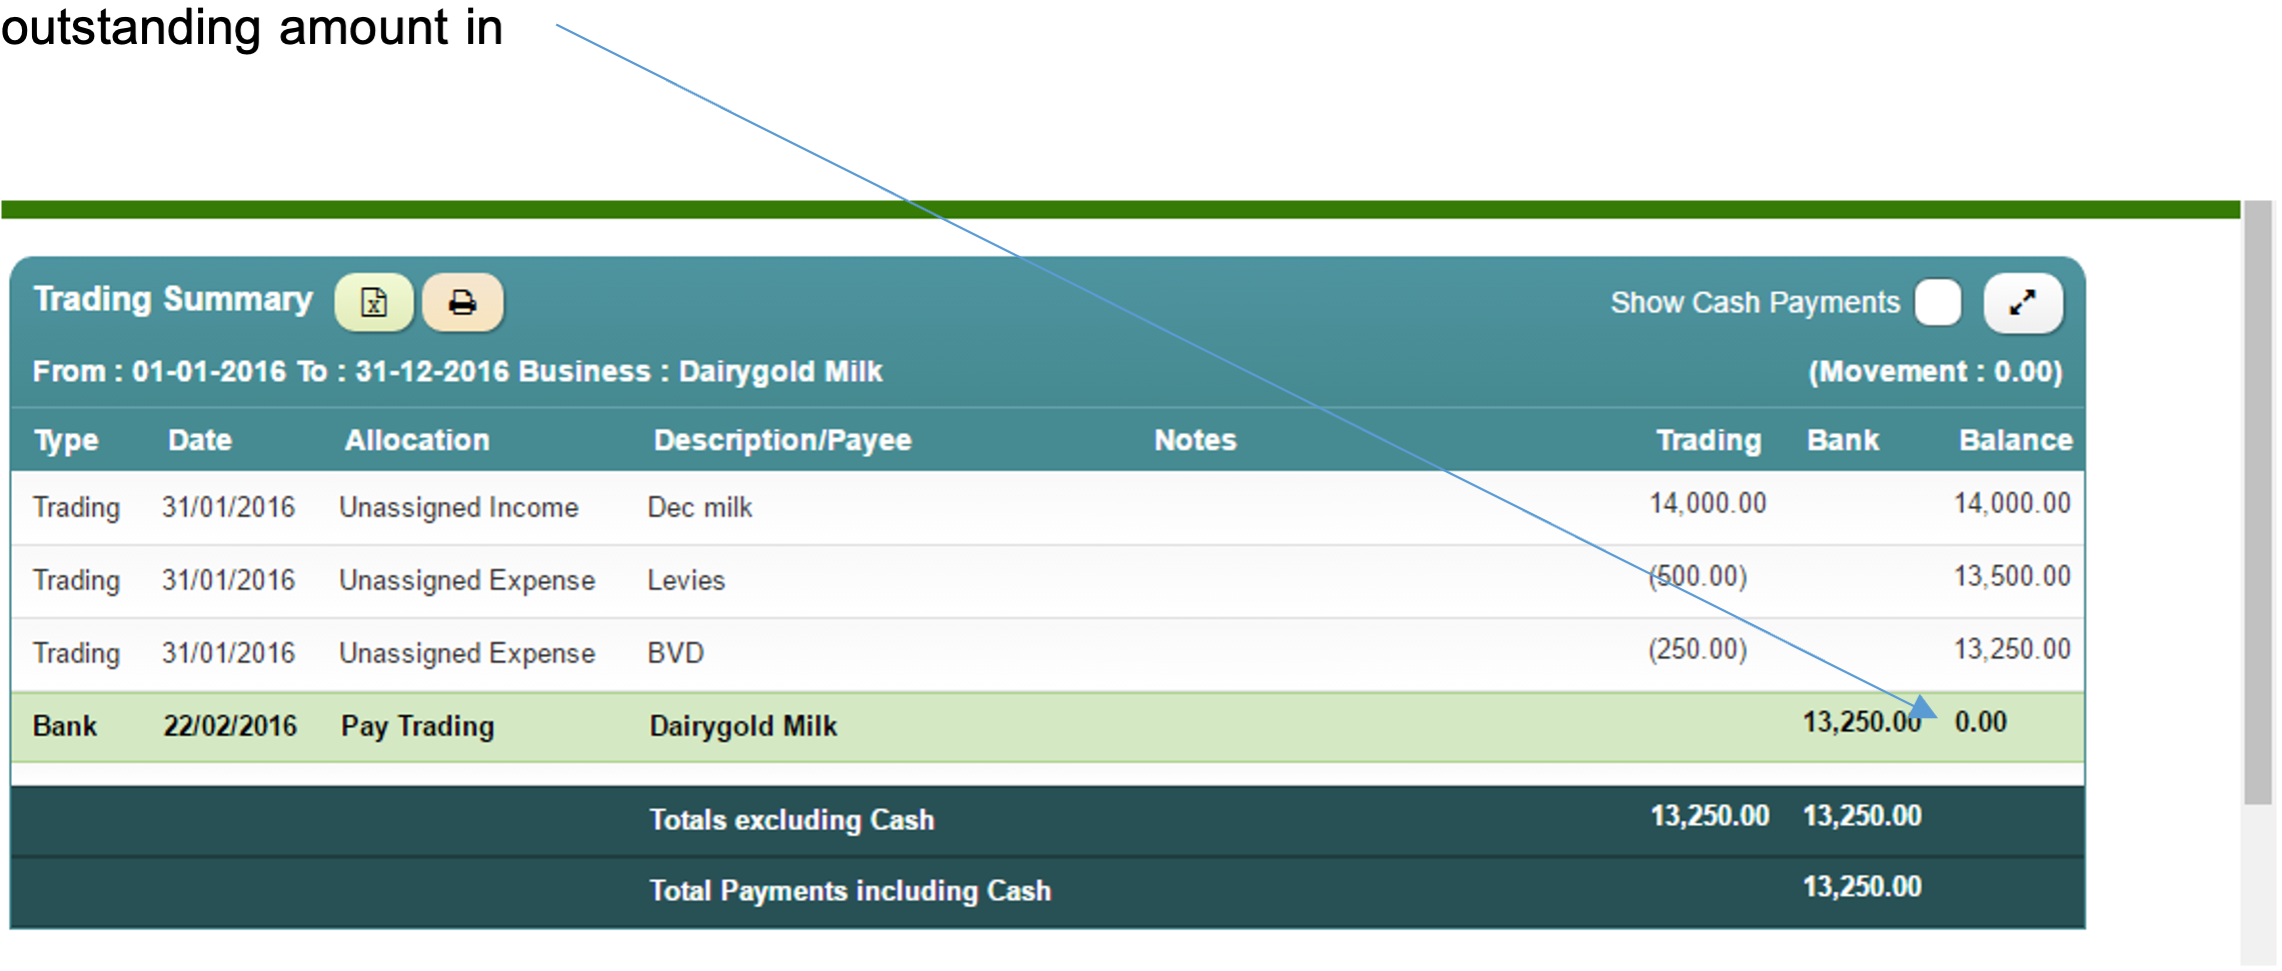
One check to ensure all is in order, is to run your trading report for “Dairygold milk”.
You will see below that the January milk is recorded, and the receipt the following month correctly clears the the outstanding amount in full
Discover how we’ve helped clients
Shared ambition leads to shared success
:format(webp)/f/122463/1000x667/2c4c74d420/james_rachel_creighton.jpg)
:format(webp)/f/122463/1800x1200/a18370008b/client_success_story_donal_shinnock_1.png)
:format(webp)/f/122463/1200x800/ad41b4fcf0/john-purcell.JPG)